TOP

BOAT PROBLEMS: Our Fuel Tanks Are Trashed

We decided to start this week off with a little break from boat work to explore a slice of our Tongan neighborhood.  Because all work and no play make Jason and Nikki a dull couple.  Along the journey, we meet a local boy who decides to not only be our guide but our film director too.

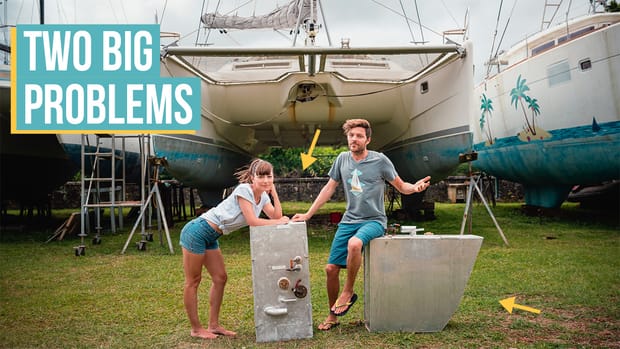
Then, it’s back to the boat restoration and getting our home livable again.  The scrubbing continues as does the next big project: our diesel tanks.  We knew our port side fuel tank was pitting and was in need of repair/replacement but we thought our starboard tank was ok.  Turns out, removing our sailboat’s 15-year-old aluminum diesel fuel tanks turn into a challenge with a surprise.


Jury Rigging Fuel Tanks

Wild to think a $5 JB Weld SteelStik could be our best temporary solution – https://amzn.to/2FV7J1s

We’ve been going back and forth with what to do about these tanks and it’s been a very interesting thread topic with our Patrons (thanks for all the tips!).  Obviously, we need new tanks, but ordering custom tanks and shipping them here to Tonga doesn’t make financial sense. It would take 4-5 months to create them and ship them here, plus it’s a huge risk because of the unique dimensions and custom fittings.  If anything is off, the whole thing would be a complete waste.

Our plan of attack this week (unless one of you has a wildly better idea) is to use the JB Weld and fiberglass only a portion of the tank to provide extra holding for the JB Weld.  Then 🤞🏼 we can shove them back in the insanely slim hole from which we pried them out.  Hopefully that will keep them from leaking for a short period till we can get to NZ or AUS and have them replaced.


🙏THANK YOU!

Ups, downs and all arounds, we share it all. We’re able to do so because people like you show up each week, read, watch, comment, share, shop our gear store, and toss a tip in our production jar. If you like what you see, consider joining us on Patreon or there are lots of FREE ways you can show your support.


🎥CAMERA GEAR USED TO FILM THIS VIDEO📷

See All Of Our Photo & Video Gear here: gonewiththewynns.com/photo-video-gear


🎶MUSIC IN THIS VIDEO:

All From Artlist

Hello there! I honestly don’t know what to say, so I am going to tell you a bunch of random facts instead. I'm a fish eating vegetarian who hates spiders and loves snakes. I almost never took vacations growing up. I wanted to be Pippi Longstocking (still do). I misspell about every other word I write and still struggle with grammar. I love splurging on a good high tea (which is really hard to find these days). And whatever you do, don’t tell me I can’t do something, because then I'll HAVE to do it!

Comments (73)

  • Bruce

    I have one small solution you may want to think about that may help out with all the cleaning and the mildew issue you were having in this video. You can get some DiamondFinish Clear which is a clear coat that you can us on cars. The finish can also be used on boats and other wood surfaces as well that will help protect the wood from moisture by blocking it out and prevents the buildup of the mildew as well. Not to mention that it will also beautify the boat making it look all the more attractive at the same time which includes the gelcoat on the outside of the boat helping to protect the boat and even the engine prop from the salt water. Just a thought.

    reply
  • james aughton

    Tank in a tank,,,,,,find a fuel tank bladder, cut an access port in the top of the holey tank and drop in the bladder. I believe some aircraft guys do this for old single engine planes

    reply
  • Roger Cox

    A couple of ideas. The idea of Martin Buinicki is square up and very feasible. But, knowing exactly how is essential.
    1. When welding sheet metal of any kind, control of heat is essential to having a final product that is square and true.
    2. Most decent welders can do this job. BUT they need to be incentivized to go slow. Very slow. Make the job work for you. Not the other way.
    3. Create the new strips of aluminum from a very weldable alloy. Read 5XXX series. Marine aluminum alloy. Many are very similar, but get advice from a company that makes aluminum. Availability makes the final choice.
    4. Cut out one area for one of the new strips. Weld the replacement strip into place using. First tack welds. Lots of them one tack every 5 to 8 inches. Finish this first stripe before starting any others.
    5. When doing the welding on the one strip that is being replaced, use the idea of torquing down a head. You torque opposite bolts, you weld opposite areas one strip at a time. Make the weld segments when welding no longer than 2 inches each. Weld 4 total weld segments. Wait for the tank to cool to the touch of your hand before making more welds.
    6. Trust me, this may take several days. Most welders will not attempt the job if you describe it until you incentivise them.
    7. These tanks, as far as the tanks go will be as good as new tanks.
    8. But you discovered the problem of why the corrosion took place in the first place. Salt water in the tank cavity. This must be corrected. That is another project. Best of luck. Just an engineer/scientist who is handy around the farm.
    9. through 12. Did you hear me? Correct the salt water around the tanks. Aluminum tanks and salt water?

    reply
  • Michael

    The correct answer is Palmerston.

    As to the tanks, you must understand what is going on in the assembly of that location. The tanks fit down into the hole and are padded at the bottom with the neoprene strips. The sloshing of the fuel and the movement of the boat causes the tanks to move a little bit. This movement causes abrasion when particles of dirt get in between the surfaces. The abrasion causes the wear you experienced.

    Another problem is the galvanic action, as mention by others. And then there is salt air.

    In all cases, isolation is the key (as much as possible). The use of breaks between dissimilar metals (as mentioned by another), the replacement with new padding and adding a little padding to lock the tanks in place after putting them back in. Maybe stuff something down the sides to stop movement.

    The pads on the bottom should probably be stuck to the tank rather than the floor of the space. Let the movement happen on another, more forgiving surface.

    As also mentioned, the quick and sometimes very long-lasting solution is to coat the inside with fuel tank liner. It is poured in the main fill point (probably where the fuel gauge float mechanism is) and the tank is turned all around to coat the inside. Once it sets up, you have something that can last indefinitely and doesn’t rely upon the outer metal to contain the fuel.

    I would sand the metal with some ScotchBright discs and then use the JB-Weld as needed. But that is not to make it leak-free, but to maintain the tank integrity and remove existing corrosion.

    A bladder tank would probably be better than the aluminum, if you feel the need to replace the tanks. They are easy to insert and remove because of their flexibility. But I am just not convinced you need to replace them at all.

    Finally, you need more fuel filters. You had water in the fuel, and you cannot allow that. Of course it may be because you had a partially empty tank, which causes condensation. If setting idle a long time, you could drain out the fuel. Before starting again, you need a bottom drain in the tanks to remove any condensate, before refilling with fresh fuel.

    Hope these ideas help. Feel free to contact me any time.

    reply
  • Bill

    It looks like the bottom of both tanks are flat. If all the leakage is on the bottom the best bet might be to just cut the bottoms off maybe an inch or so up from the base then have new ones welded on. Then before replacing them place wedges under them the same size as the amount you shortened the tanks by. Seems like that would cost much less than having new tanks built.

    reply
  • Daggers Down

    We had a diesel fuel leak on our boat and learned from a friend that hand sanitizer takes the smell out better than anything. It worked great. FYI. Enjoy your show!

    reply
  • Horst

    Saltwater is not eating aluminium. It needs more to get problems with galvanic corrosion. I gues you own a copy of : “Boatowner’s Mechanical and Electrical Manual” written by Nigel Calder? (If not get one 😉 Have a look at page 264 and what he is writing about corrosion. The main thing is to stop at least one of the preconditions for corrosion. One thing would be to avoid direct contact between different metals (like with your copper piping) by using plastic fittings or exchange the piping with plastic hoses (at least for a few cm)
    If you find some Aluminium nearby: cut a big hole in your tanks and paint them from inside (there are loads of paints available which can be used for drinking water). To close the corrosion holes: it is possible to weld them if you find a good metal-shop nearby. It is also possible to braze Aluminium – that does not need overly expensive and bulky equipment but you need to get the correct solder (not every brazing technique is possible). If you are using a epoxy-Metal mixture to fill the holes: take care not to bring in any other metals than Aluminium or you get corrosion again, because saltwater as a electrically conductive
    fluid is near.
    When working with Aluminium it often is basic that you know the exact alloy that was used. Avoid mixing alloys. But i guess this comes too late anyway.. 🙂

    reply
  • Some facts

    AHOY there !!! Some times you guys make me laugh . but this time I am al Little concerned . I am in R&D petrochemicals . That JB weld is just a patch and do not think anything more of it . Its to get to your next destination . Arron Daniel has most of it right Sorry I did not read the whole thing . . But the right way is to Hydrotest the tank first then mark the leaks with a permanent marker. drill and file holes a little more and then have the aluminum welded. Then hydro test the tanks again to 10 to 20 psi . IM Sorry Jason Plastic does not last forever In fact as soon as it is made it starts to deteriorates on a molecular level . . and plastic is an Organic Compound just like FUELS. Some of your NONE U.S. fuels will eat at the walls of the plastic . They are not regulated. Also you will have to change the Jugs you have every 2 to 4 of years. depending on the jug You might have a date stamp on the jugs as well . Stainless tanks are great but as ARRON said 316L SS but there is problem with that , ONLY U.S Stainless . The U.S. has the highest standards when it comes to metals . RECALL the Anchor Chain . it will pit and rust and then you will have even more problems than the Aluminum tank . and here we are again with the NONE U.S. fuels and the biofuels can be worse. . Actually the aluminum is good/ ok but if at all possible have it coated most of the way up in What they call plastic dip a couple of times. WILL be hard to find/ do . .It will be thinner than the fiberglass. the fiberglass sounds nice but what if you have a problem with the tank again Fiberglass really does not seal unless you put a coat of acrylic on it, , The plastic dip product you just take a razor knife to get off. and it peels. . but you will have to be carefully in placing it back in the compartment . also probably will have to round to the top a bit so dip stays in place.
    The person with the wood strips , Bad idea use hard strips of plastic. put some light glue to hold them in place while you put the tank in . If you do it.
    Glass lined tanks Very Bad idea. You might want to ask yourselves .Why did leopard put in aluminum tanks ?
    Cost, Dependability , Material integrity, Safety. Weight.

    Livin the dream Good for you .

    reply
  • Sergio

    Hi Nikki and Jason,
    If you fiberglass only half the tanks when the level of the diesel become higher than the level of the fiberglass you apply the internal pressure of the diesel will make the eventually leak go over the fiberglass line.
    To work you will need to fiberglass to the top.

    reply
  • Aaron Daniel

    Aluminum tanks in a salt-water environment…only a limited life expectancy! Even stainless steel tanks won’t hold up forever in that exposure (though 316L SS would be the best if you have an opportunity to go that way with replacements). Plastic tanks – I won’t ever trust them after some experiences RV’ing – though a leaking tank is no safer than a plastic tank in a fire.

    You can test for pinholes (or craters – the mode of attack salt water tends to assert on most aluminum – rather than surface corrosion) by applying a small amount of pressure to each tank (without knowing what the tank thickness is – use no more than about 1 PSI – use a loop of clear hose connected at a tee at the pressure inlet – filled with fresh water about 30″ deep filled with fresh water with the top of the hose 28″ above the top of the tank being tested (like a p-trap under a sink – but 28″ additional height) that will “blow out” if you happen to over-pressure the tank. With pressure in the tank, use soapy water on all the outside surfaces to check for leaks. For small (pinhole) leaks – drill a 1/8″ hole through them before applying the JB weld (I know – sounds counter-intuitive – but the JB Weld needs a space to flow into. You can wash out the tanks with a good detergent and plenty of water – the cleaner the inside surface – the better the opportunity for the JB Weld to stay in place. Squeeze the JB Weld into a hole from the bottom upward – so that at least a small amount of JB weld will flow onto the surface above – thus providing an effective ‘plug’. Tape off the JB Weld repair temporarily with a small piece of duct tape while it cures.

    The fiberglass will provide great protection for the tank – no need to coat them more than half way up the sides unless you expect them to sit in deeper saltwater. If you can – lightly sandblast the surfaces where you want to apply fiberglass (or at least sand with 80 grit sandpaper). This provides a fresh un-oxidized surface ‘profile’ for the marine resin to stick to in spite of any remaining residue. You may not have a choice about what ‘weight’ of fiberglass fabric you can obtain locally – but just about any thickness will work (just not mat). Buy extra fiberglass and lay it on ‘diagonally’ (with the threads of the fabric 45 degrees from the axis of the tanks). This will go around corners much easier without bulging. Apply a ‘tack’ layer of resin (mixed with enough catalyst to make sure it will set – but not too quickly) over the entire area to be covered by fiberglass fabric. Apply a saturation layer of resin with a slightly higher catalyst content to fully cure. After than all cures – check for any bulges (bubbles under the fabric). If there are any – grind them out and apply a new small fiberglass patch with about 1-1/2″ overlap and resin them on. After all is cured – apply a top coat of resin and let that cure.

    Done well, this will only add about 3/32″ thickness to the surfaces – or about 3/16″ to the overall width of a tank – and provide a reasonable repair life.

    You could apply another layer to just the bottom of the tanks (laid with threads 45 degrees from the first layer) if you want to extend the durability and protection for the ‘weight bearing’ surface to prolong the expected life of the repair.

    If you can afford 316L Stainless Steel replacements in the future (16GA Stainless will serve as well as 3/16″ thick aluminum and only weigh a little more), apply the above fiberglass treatment to the stainless steel tanks before putting them into service, and you could expect a lifetime of service (assuming you don’t let saltwater accumulate in the bottom of the fuel inside the tank for long periods of time).

    I offer the above – for what it’s worth. I’m sure – as usual – you have received plenty of good advice and have no doubt done a lot of internet research – good luck!!

    reply
    • Aaron Daniel

      This is what happens when you are too familiar with a subject – you forget to describe necessary steps. With the tanks up-side-down, Immediately after applying the ‘tack’ layer of marine resin (before it has a chance to harden), apply (stretching into place diagonally) the fiberglass fabric. Press it into the ‘tack’ coating with a brush…pushing and maneuvering it to try to minimize bubbles or bulges in the fabric – corners are the worst to deal with, and a little extra resin will help. Since at least one of the tanks has a ‘recessed’ surface, you may want to apply a layer of fabric only to the recessed surface prior to applying the main ‘wrap’ (using a file to remove and round sharp corners of protruding aluminum edges will help too). After the fabric is all ‘tacked’ to the pre-coated surfaces, simply cut excess fabric with scissors so that it’s edges are 1″ to 1-1/2″ inside the pre-coat of resin. After having all the fabric in place with no apparent bubbles or bulges, then apply the saturation layer to the fabric with a generous amount of resin. Where these are located, you don’t care about their end appearance – so some ‘runs’ won’t matter – too much is better than too little.

      reply
  • Bob Hay

    I beleive a gas tank place can coat the inside not the outside with a gel or fiber glass resin that does not affect diesel This will not affect the outside dimensions

    reply
  • Keith Robert Braun

    Palmerston (sp.)?

    reply
  • John Brown

    i have had to repair a lot of motorcycle fuel tanks over the years. Water inside of your tanks has most likely corroded the inside of the tank also. In the video the last little bit of fuel you drained into the clear container looked like it had a lot of water in it. Those people recommending some type of coating on the inside are correct. Proper Cleaning and then coating the inside is a lot of work. Not sure which products are the best to use with diesel. As mentioned “EternaBond” tape maybe an option on the out side. I would try and experiment with Eternabond tape on a piece of aluminum, Then soak it in diesel to see if it will hold. I don’t think the adhesive will withstand the diesel and the tape will come loose. The problem with paint on the outside is if there is even a pin hole the fumes will blister the paint on the outside and a leak will develop.

    I use this company for all of our motorcycle tanks that need linings both steel and aluminum. http://gastanklining.com/. These guys are very knowledgeable. It might be worth contacting them.

    Good luck. We look forward to another Video.

    reply
    • Ken Carlsen

      I agree with you about the Eternabond tape not sticking if exposed directly to diesel fuel. If they only fiberglassed the lower half of the tank and used the tape to seal the seam on the sides where the fiberglass ended that should keep the seam tight and safe from infiltration of water &
      moisture from above that could ruin the fiberglass aluminum bond.

      reply
  • Kathy H.

    Don’t bother fixing fuel tanks. Get plastic tanks, and SMALLER, so easy to get in the space available. Not sure you need the same size for the boat as you have now, and you can always have a few jerry cans stored away if you need to add fuel to the tanks when under way. Always keep things as simple as possible on a boat!

    reply
  • Douglas

    https://www.marinetalk.com/best-sealers-for-aluminum-boats/

    Hi you two,
    Maybe this web site will assist you in coating your fuel tanks.
    All the best,

    reply
  • Liz

    Palmerston! Cook Islands, I believe. Really cool island and amazing people. Those videos were some of my favorite of yours 🙂

    reply
  • Rob and Marcie

    We can’t open this week’s video on any of our platforms
    All of the previous ones have always opened and still do
    Have you heard of anyone else having issues?

    reply
  • Ken Carlsen

    If you decide not to encapsulate the entire tank with fiberglass you might want to investigate sealing the edges with EternaBond RV Mobile Home Roof Seal Sealant Tape & Leak Repair Tape 4″ x 50′ Roll

    reply
  • loyd

    red coat fuel tank liner used it for 30 + years. get that jb crap off and contact me, coat tank inside plastic liner. will seal till tank falls apart.

    \

    reply
  • Alan Solomon

    Yes, my initial thought was somewhere in the Cook Islands. As I see from other comments it seems to be Palmerston Island. William Marsters came to Palmerston in 1863 and started a large family from 3 Polynesian wives, which still exists today.
    I have no problem watching your videos till the very end. With you two smiling and laughing all the time I am having a lot of fun watching your videos as you both did making them! It may be that your ocean, tropical life is providing a subconscious, freeing, peaceful 6th sense in me through my monitor!? Who knew?
    Anyways, your videos are excellent if you are sailing the seven seas, swabbing the deck, hiking a mountainous trail, cleaning the hull or grocery shopping! I look forward to watching every Sunday or whenever. Sound sleep and Good Cleaning,

    reply
  • Lisa Day

    I always heard the way to really test your marriage was to wallpaper a room together! I think the same could be said about cleaning and repairing a boat. You two are great together. Love is patient. Love is kind. Love is evident in the way you relate to each other. Thanks for sharing the mechanics of sailing and the softer side, too (even though you may not have known you were doing that).

    reply
  • Sean Riggan

    Lots of comments & opinions here, and here’s one more… Many years ago, I had a similar issue with our Catalina 30, where the aluminum diesel fuel tank had been in contact with water, generating the same pitting you have. I followed the same process as you (cleaning/filling the pitting with JB weld), but I think a key piece is that I used “Gluvit”, which is a hard epoxy paint. Many stores carry it, bit I just found it on Home Depot’s web site.

    See: https://www.homedepot.com/p/Marine-Tex-2-lbs-Gluvit-Waterproof-Epoxy-Sealer-RM330K/309892540

    This is many years ago, but I painted the bottom of the tank, and up the sides 4”-6” from the bottom (exterior). As it’s a paint, there’s no way for water to contact the tank or get between the aluminum and the paint, so no need to paint beyond where the tank and seawater would remain in constant contact, plus a few extra inched. It goes on quite thick for a paint too, and was hard as nails, though flexible enough to flex with tank movement without cracking (this is in Alaska, where colder temperatures would presumably make the paint more brittle than your tropical climate). In any event, that repair lasted many, many years without leaking. I think you might find that to be an essentially permanent solution. (The inside coatings would be nice too, but I can’t imagine trying to remove diesel residue from inside the tank, so that the coatings would stick. Besides, you’d STILL need to coat the outside of the tank with an epoxy, to prevent additional pitting/corrosion on the exterior of the tank,)

    Hope this is of some help.

    Regards,
    Sean & Amy Riggan
    S/V. Q-II
    Whittier, AK

    reply
  • Paul Casacci

    Oo, oo, pick me!! Pick me!! (Waving hand wildly from Maine)
    You delivered a printer to Palmerston, in the Cook Islands!!!

    Know I’m not the first, and surely won’t be the last!!

    Please tell how may responses you got, bet it will be HUGE!!!!

    So glad you are back on stride… Work a little, play a little, film a little, edit a lot!! Hang in there, you’ll be back on board before you know it, and then have nowhere to go!! There’s no reward for finishing fast, but great reward for finishing well, having done a quality job. I don’t have any expertise in fuel (tanks or otherwise) but that suggestion of the epoxy to slosh around inside the tanks, if it can be prevented from fouling inlets and outlets, sounds promising… But what do I know??

    Best wishes from Wales!!!
    Paul

    reply
  • Gareth Armstrong

    Hi again,
    Have a look at KBS Fuel Tank Sealer
    G

    reply
  • Michael Wilson

    Have someone who can weld aluminum weld up the holes and then have the tanked sealed with a chemical product that can be poured into the tanks after welding. They would most likely last another ten years.

    reply
  • Pam Fox

    I think the island was Palmerston? Founded by a guy and his three wives. You helped the kids pick up plastic trash on the beach even though the island was 40 miles from any other land and got their mail and packages by freighter. Went to church, had to wear a hat. They were all fluent in english even though the church service was in another language. Loved it.

    reply
  • René Lykkeberg

    Drill the holes 6/8mm make screws in the holes and thigten with locktite !

    reply
  • Gordon

    What about coating the base and sides of the tanks in a rubberised polyurethane, like you’d use in the loadbed of a pick-up (bakkie here in SA)? Should be a thinner layer than fibreglass, easier to apply and I would imagine a better bond with the aluminum.

    reply
  • Jason

    Hi guys, I worked with Fibreglass for years. Probably your easiest way to repair is to put the JBs in. Then sand the outside of the tank for a few inches higher than the leaks and glass it. Definitely use Epoxy resin not polyester. Also just use a very thin glass cloth. Commonly called skinning, sheathing or boat cloth. Dynel cloth is another option if you see any as its extremely wear resistant. Do you have an address I could send some to you as I’ve got some. You guys are awesome! Can’t wait for you to come to New Zealand! Cheers

    reply
  • Chad

    I heard the Nahoa theme song in your video today, that couldn’t have been an accident. Are you guys pals?

    reply
  • Jeff

    I repaired a gas tank on a motorcycle by removing all the , plugging all but one hole, pouring resin into the tank, and turning the tank to plug the holes. Once done I cleared the other openings and reinstalled the valve. That may work for the tank that doesn’t have room for fiberglass on the outside

    reply
  • Richard Fenters

    While the tanks are out, can you not carefully measure and photo them for replacement with plastic/bladder style tanks for fabrication in NZ or Australia? Maybe you can even make an exact mould of them if needed to help with a temporary/and or permanent fix? Send the specs/pics/moulds to NZ or Australia so that by the time you get there, the replacements would be ready. In the meantime, you could perhaps get temporary tanks instead of trying to repairs those old leaky ones. Obviously, the temporary tanks wouldn’t have to fit the “storage bays” exactly and if too small, you could possibly store a third tank somewhere… I really don’t have much confidence that the JB Weld patches will last very long anyway as more holes will likely appear. You just need a short term easy/inexpensive fix that will get you to the proper place for a permanent solution and maybe the JB Weld is as good as you can get currently! Now, finish the cleanup and check the climate charts for some strong favorable winds, and head South pronto mes amies! Well, as soon as Covid allows of course~~There is always a catch!! . PS: How does one vote from such a distance?

    reply
  • Brian

    There are various tank sealant materials that can be spread on the inside. You might have to cut a hole big enough to access the inside of the tank, but that can be welded back easily. I do some research and fine out what tank sealant is best for your application. Should be some kind of treatment or paint etc, that you could coat the outside of the tank with to at least slow down the corrosion. Like others have suggested, If possible get those tanks up off the bottom as much as possible and rig up some kind of pump to keep the area as dry as possible. Good Luck.

    reply
  • Scot

    Consider using a fuel tank “sloshing compound” similar to what is used to seal “wet wings” in aircraft. The structure of the wing is the actual fuel tank, and the sealer is “sloshed” to seal any crevices from fuel. Below is one brand that I used successfully for a small diesel fuel tank. You may STILL need to fiberglass the outside of the tank to prevent the damage from the salt water immersion in the bilge. Good luck, and glad that you’re finally back in your home again!

    https://www.dimecitycycles.com/red-kote-fuel-tank-sealer-liner.html?gclid=EAIaIQobChMIk_mtl67Q7AIVooVaBR01DQlOEAQYBCABEgJjBvD_BwE

    reply
  • Beav

    It might be a PITA but I’d investigate using your jerry cans in place of the tanks. Possibly equipping the caps with fittings for vent and supply with a shut=off on each supply or manually switching one cap with fittings as needed between tanks (cheaper but also a bigger PITA.) Nothing like being in the middle of a passage and finding all your fuel has seeped out from a dodgy repair.

    reply
    • Beav

      Also consider that anything you use to glue over a tank is best used on the upper half (upper 1/4 in my book.) Weight, continuous sloshing that flexes the tank, etc. aren’t your friends.

      reply
  • C2

    Hi Nikki and Jason
    My name is Chris and I have many years of experience working with aluminum fuel tanks and repairs I’d like to propose that you consider using PR 1428 B1/2 which is a poly sulfite material designed for this type of repair and comes in 6 ounce tubes ready to mix which makes it easy on your part red 654 Sim kit with PR 70 adhesive promoter for selling your tanks you can purchase the product from aircraft Spruce.com
    If you’d like instructions on how to clean the tank and prep it for this type of repair please don’t hesitate to send me a response back and I’ll provide you the instructions I do not think you’re going to be happy with a fiberglass wrap repair I don’t think it if last the rest of your trip
    I’m sure you’ve heard a lot of opinions but mine comes from 37 years of aerospace experience, hope you guys make the right decision because if not you’re gonna be smelling diesel fuel soon after your repairs due to expansion and contraction of the tank with the temperature changes
    Sincerely C2

    reply
  • Ed Grant

    Man O Man, do you kids have a ton of work to do in order to get back on the water! (understatement) Looks like you are well on your way though and it would appear with great attitudes. Great team work kids! Your hike up the “mountain” was well worth the views you showed to us. Nice but a bit precocious “guide” along the way. The view looks like there are many small islands surrounding the one you are on, yes? Are you staying at your friends house during the cleanup time? How nice that they have room for you and The Crate! Where was this crate during your time away from Tonga? I assume your friends have kept it safe at their home. The tank removal look like a daunting task for sure, but Jason is a good worker bee and he “gotterdone” just fine(maybe a bit “high” from the fumes) but really should have worn a respirator! I’m looking forward to you upcoming episodes and so very happy you and Curiosity are back together!

    reply
  • Marjorie Nehlsen

    I got tired out watching you both clean and repair. I cleaned the floor freezer in the garage this morning and I was in the same position as Jason. I thought that was a big job but yours is overwhelming. The end will eventually arrive and imagine how you will feel again riding the waves. Sorry don’t rember where printer went.

    reply
  • David

    Use Red-Kote to repair your fuel tanks. I have used it on 50+ diesel and gasoline tanks without every having a problem. It makes a polymer coating inside your old tanks. This is the easiest, fastest, cheapest and permanent way to fix your existing tanks.

    reply
    • Roger Cox

      Coating the inside is a wonderful idea. However, I doubt it will be a long term solution. If it were my tank, I would definitely do the Red-Kote after the repair I suggested. Replace the corroded areas with new aluminum strips. weld in place. But the core problem of salt water in that tank area is the core problem that needs to be solved. Not addressed.

      reply
  • Monica L Cordell

    Now for a girl comment…Love your hat, Nikki!

    reply
  • Stuart

    Another element to this could be stainless steel?
    If you are planning to replace these alu tanks in the near future you could have someone in NZ fabricate some custom tanks in SS.
    You could send drawings and really good measurements (minus 10mm < to make life easier and allow for errors) to a NZ welder have them shipped back to you ??
    Good luck you guys are great keep smiling

    reply
  • Bill Piper

    Whoa! Jason, there’s a very simple, inexpensive, and easy way to fix your tanks! Since the tanks are out, you’ll need to do some metal (aluminum) prep. This can be a chemical or detergent to remove the lingering fuel that adheres to the aluminum. Once completed and the tank is dry, then mix a 50/50 solution of fiberglass resin with hardener. (Don’t use an “eco-friendly” resin. The old resin is fossil fuel based and will readily mix with some oil on the surface.) Be sure to mix plenty (1 gallon resin, 1 gallon hardener) and have a disposal bucket ready. Dump the mix into the tank, and roll the tank around, getting a coat of the mix on all internal surfaces. (Use a flashlight to ensure coverage, but most likely the holes are on/near the bottom where the contaminants are), and invert the tank, going the mix on the top of the tank. You’ll have plenty of time to complete the work, so be thorough.
    Finally, invert the tank and empty the remaining mix into a bucket, where you can either dispose of it, or use it for the second tank.
    I would allow the tanks to dry for several days before filling them with fuel.
    Congratulations, you now have glass-lined tanks! I have performed this effort on many tanks, including diesel and gasoline for 50 years, without an issue.
    Best of luck, and get back on the water soon!

    reply
    • Bart

      Agree 100%. I’ve done the same. Also had one boat with fibreglass tank. Inexpensive and simple way to fix the problem.

      reply
  • Don

    IMO find a good aluminum welder. Have them grind the tank to clean base metal and weld the holes closed. Grind weldment flat and inspect the welds for porosity and crack. Good as new. Fuel tanks aren’t really a patch kind of thing.

    reply
    • Roger Cox

      Don. Right on target.

      reply
  • Mike Emerson

    Is there a generic aftermarket tanks your could source to fit in both sides? I remember having dual tanks they were hooked up to draw from both sides port and starboard at the same time, only one tank needed a sending unit for the fuel gauge. Each tank had a manual shut off for servicing. You could have a third tank, like an emergency tank hooked in and have that tank in an area not used. Not all needs to be on the floor. May have to get creative… I’m a Property Engineer and a Certified Pool and Spa operator. Sometimes you have to think out of the box.

    reply
    • Jana Plummer

      Is there a way to shine a light inside tank at night and see if any area(s) light up to highlight the hole(s)? From: Not a Sailor or mechanic. LOL. Best of luck and happy travels sooner than later. Jana from Lake Havasu City, AZ

      reply
  • CDR Mike

    Forgot to mention. I know you showed us the package of JBWeld that said it was for aluminum, but I am concerned about dis-similar metals mixed with salt water which may result in galvanic corrosion. I don’t know what the JB stuff is made of, but if there is steel in there, you may have a problem. Not trying to be an alarmist, but I know from my Navy days that dis-similar metals and sea water don’t mix well.

    reply
  • CDR Mike

    Good luck with the tanks! Not a fun job…
    As you have told us, you brought a crate full of stuff back and as I was watching you clean and pull stuff out of all the nooks & crannies, I got to wondering- how much of what you are pulling out are you deciding to get rid of, cuz as you know, you only have a finite amount of space for all the stuff. 🙂

    reply
    • Curious Minion

      Haha – most of the stuff was parts for repair or replacement, so not too much new “stuff”!
      Curious Minion

      reply
  • Chris Madsen

    Ship them to NZ to fabricate duplicates. Costs bucks but saves having to do a major job twice AND the last thing you want on a boat is fuel tanks held together by band aides!!! I would sleep much easier 🙂

    reply
  • Sandra

    With all your challenges I am so jealous of your ability to walk around maskless and to see other people! Way to go Tonga 🇹🇴, we up north could take some lessons from you.

    reply
  • Brad

    Just a DYI suggestion from an old time RVer – instead of foam strips under the smaller tank – put 1×2 wood strips (looks like you have a couple of inches of clearance on the top of the tank). Then secure a small plastic tube to the lowest point is the bottom under the tank and run it to the top of the tank. Now you can pump out the salt water that gets in there with your handy ‘fuek’ pump and keep the area dry. Good luck with the fiberglassing.

    reply
    • CDR Mike

      Great suggestion, Brad!

      reply
      • Brad

        PS – while your fiber-glassing the tank fiber-glass the 1×2’s. Protect them from the salt water.

        reply
  • jim ege

    I replaced my aluminum tanks with flexible bladder tanks. True I was on the Great Lakes USA Freshwater. But it was a great solution for us.

    reply
    • Jon Stensloff

      Thats a great Solution to get them to New Zealand Was about to send that suggestion to them also

      reply
  • Gareth Armstrong

    Hi Nikki/Jason
    There use to be a 3 part product available that you pour into the tank and it creates an internal liner. I don’t know if it was able to do a tank of that size, would have to research. Be aware though, diesel is a very dirty fuel and the inside of your tanks are quite possibly full of crap on the bottom inside. This is normally where the putting comes from on steel tanks I’ve done, maybe this is the case with the ali too?
    G
    NZ.

    reply
  • Brian

    I determined that the tanks on our trawler were done. I tried JB Weld with the tanks in place but every time I patched one hole, another one would appear. Removal was the only option. However, to remove them in one piece meant pulling the engine or cutting the deck and hull sides. So my only option was to cut the tanks into 3 pieces. I already had sourced plastic replacements that I could fit without major work. Smaller capacity but useable. The tanks are placed on each side of the engine with about 12 inches of clearance. Various yoga style moves are required simply to get in and out of the engine compartment. This is a brief account of the first 5 days…..

    FUEL TANK REPLACEMENT April 2017

    Started removing fuel from port tank. Fuel pump from turned out to be defective. Had more fuel on me than into the jerry can. Pulled about 20 Ltrs.
    Again with new pump pulled about 40 Ltrs. Started sucking air. Can’t be much left.

    April 11 Was to be first day of removal. Started cutting port tank. About 3/4 from top blade came out wet. ?? Cut access hole to see inside. Bottom of tank is sloped. ( I knew that) I thought another few Ltrs should do it. Turned out to be 88 Ltrs!!!!
    Currently have about 130 Ltrs in various containers on back deck. Diesel is VERY green. Will need biocide and filter before going into new tank.

    April 12 Grrr F#ck Ouch
    April 13 See April 12
    April 14 Finally some progress.
    Managed to cut a piece off the tank only to find it was too big to get out past the engine. Spent much of the time working on it and then….. the blade broke. Trip to Hardware store for a new blade.

    April 15
    Got the first piece cut down and out of the bilge. Started cutting more. Made some progress. And then…..the blade broke. Quick trip to Hardware store. Package of 3 blades. Broke 2 fairly quickly but managed to get the rest of the tank out on the 3rd blade.
    So 4 days later, the first (port side) tank is out.
    Going to take a few days to recover and let the bruises heal. A Ford Lehman is a hard bit of iron.
    I’m going to install the new port tank before i start on the starboard side so I can deal with the cans of diesel on the aft deck.
    I keep telling myself that the starboard tank is going to be easier. We’ll see.

    reply
    • Curious Minion

      That made me LOL! We have 30 yo tanks in our trawler and cross our fingers every day that they’ll make a few years more! Can also attest to the hardness of a Ford Lehman! :o)
      Curious Minion

      reply
  • mary

    It is coming along!

    I sure wish I was there to help you get the boat cleaned up and organized again. I’m sure the whole clean up/fixup is daunting!

    Good luck with the tanks. Hopefully they are repairable. I’m sure you have a huge list going for all of the items you will need to replace. Ugh!!

    reply
  • Martin Buinicki

    Why not cut out the bad spots and weld in new panels?

    reply
    • Roger Cox

      You have the correct idea. See my long comment.

      reply

Post a Comment