The idea here was simply to escape and save a little cash. At this point we’ve spent the past several weeks with all kinds of family and friends (both new and old) all across Alaska. Our budget for the Kenai Peninsula was pretty much gone…no, if I’m being completely honest we actually blew that budget before we left Seward! After a little research we found a little Wild Camping pull-out near Portage Glacier (complete with a private pond) and we thought; lets relax, work a bit, inflate the SUP and paddle. Turns out we ended up with a beautiful and free campsite along with an unexpected adventure that didn’t cost a dime!
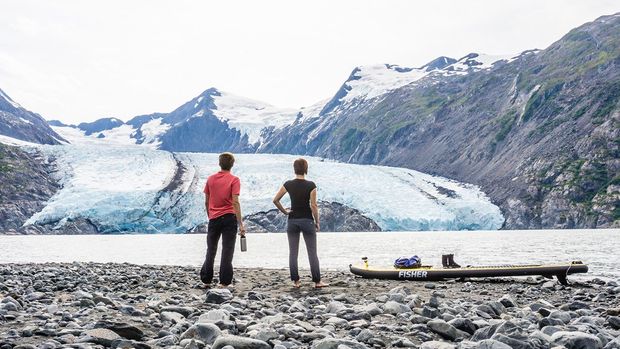
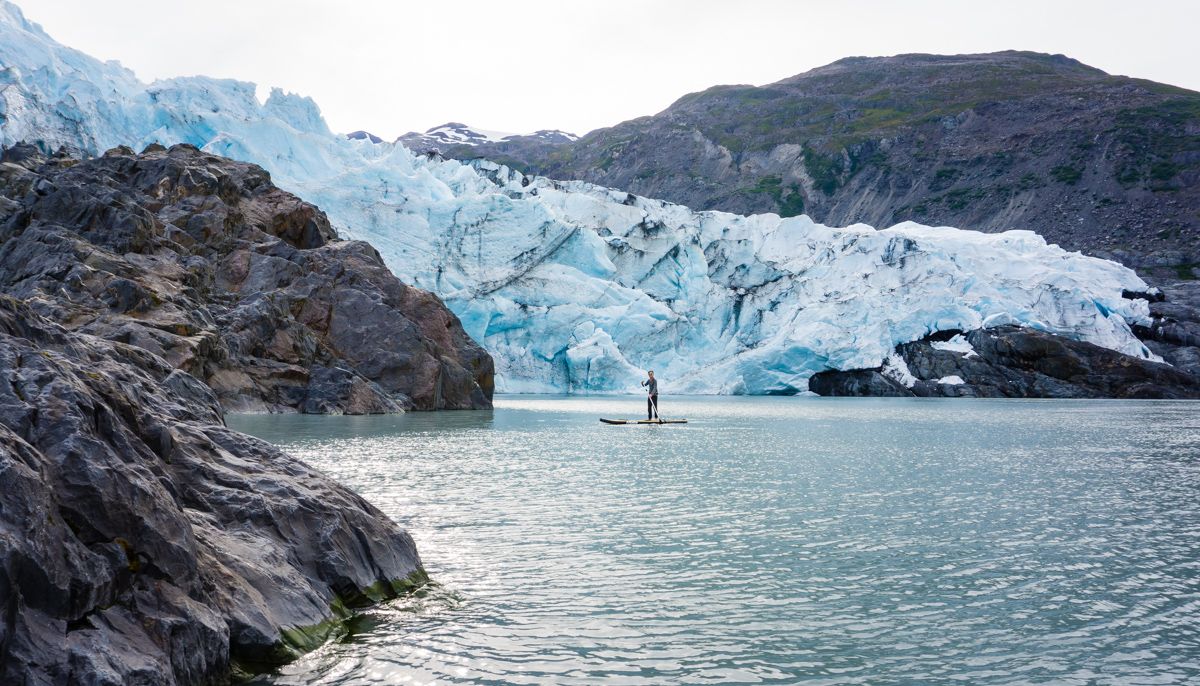
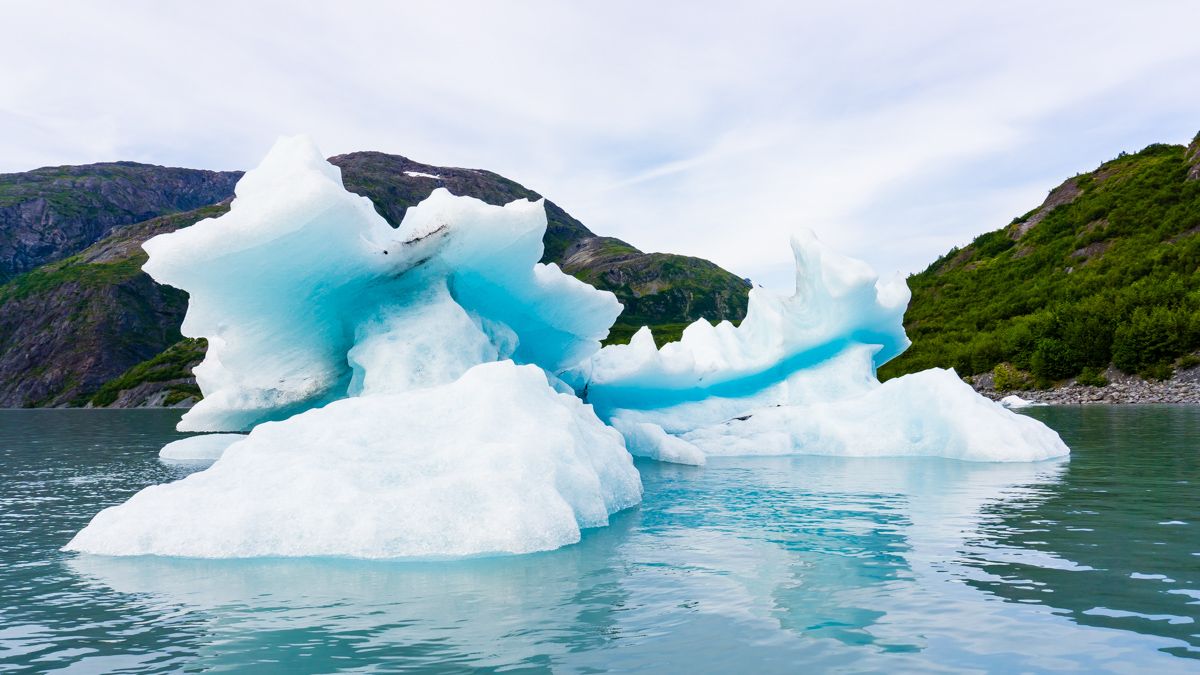
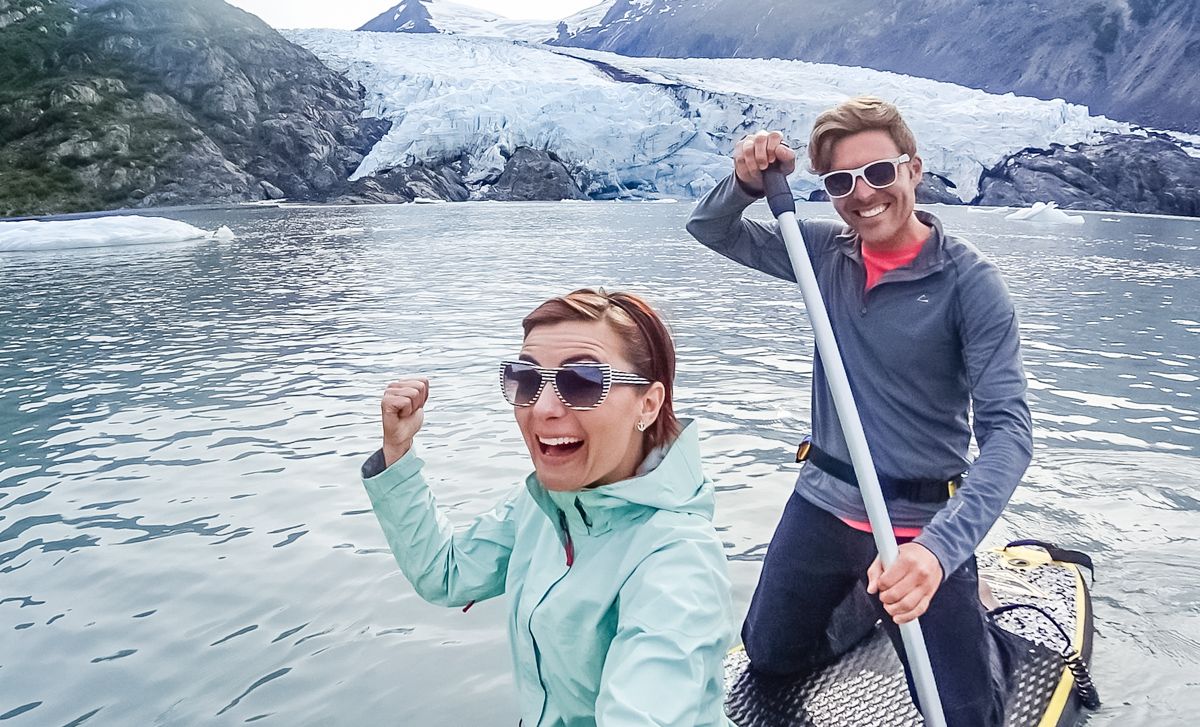
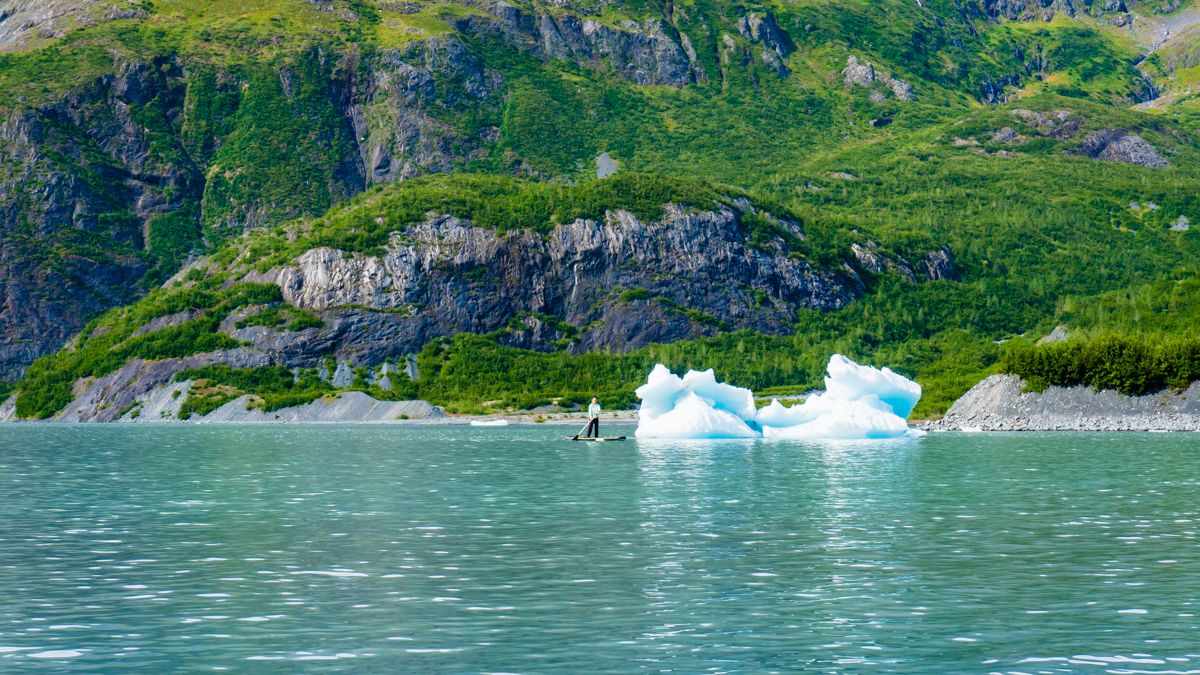
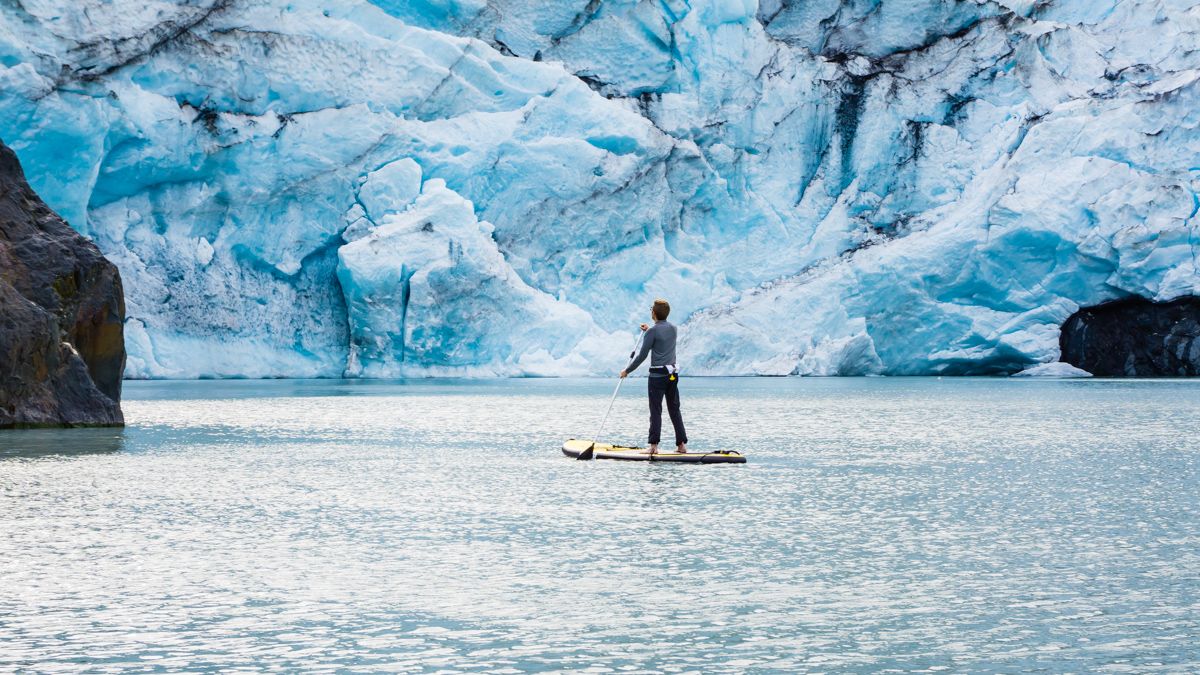
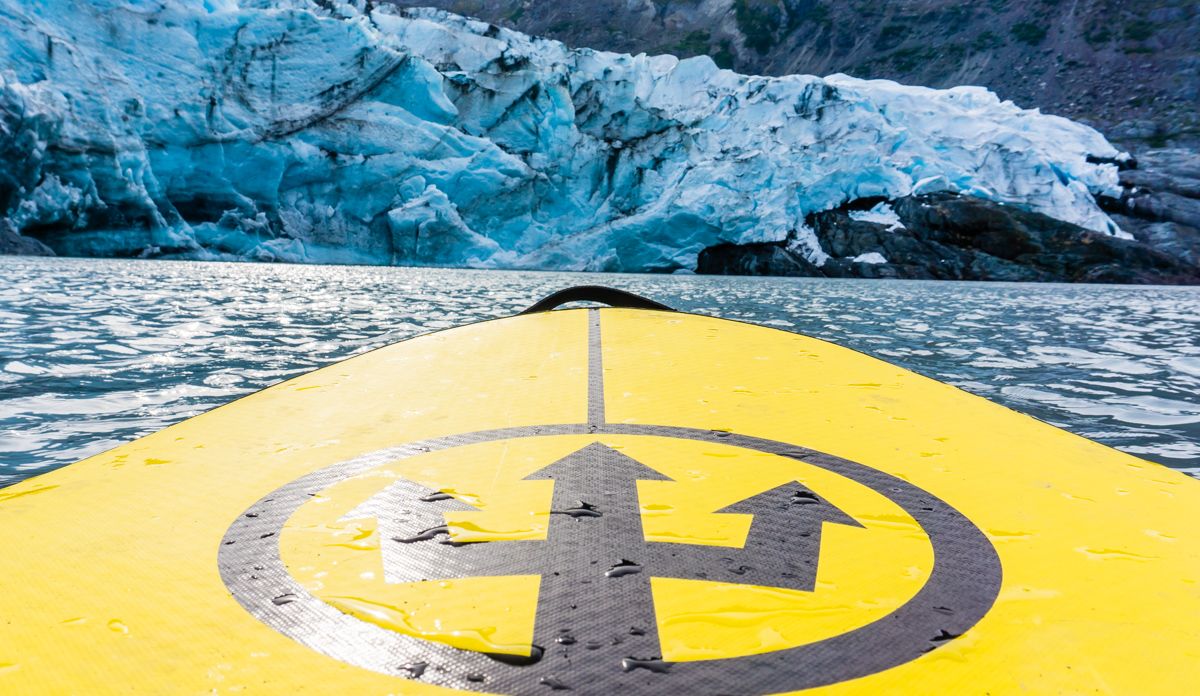
Over the years we’ve been practicing our Stand-Up Paddleboarding skills on every lake, ocean and river we can get on. But there’s something we can do in Alaska that we haven’t been able to attempt in the lower 48: paddle on a glacial lake, through icebergs and float by the face of a glacier. The excitement, intimidation and sheer joy we’ve experienced on this paddle was surreal, and to have an intimate look at a giant glacier while standing on such a small board really made us feel tiny!
Portage Glacier & Portage Lake
The Glacier earned its name because it is the portage route from the Turnagain Arm to the Prince William Sound. The lake is around 100 years old and was created by the rapid retreat of Portage Glacier. There are no fish in the lake due to the large deposits of silt. Sadly, the glacier has retreated so far into the valley the best view comes by boat, in fact you can’t even see the glacier from the Begich Boggs National Forest Visitor Center, which was just built in the mid 80’s.
The Experience
In the past it was illegal to paddle on Portage Lake due to the risk of rolling icebergs and the consistent calving of Portage Glacier, but now the National Forest allows people to launch non-motorized vessels from the viewpoint and parking area on the northeast side of the lake, just past Placer Creek. Precautions should be taken when approaching icebergs, when you hear the cruise ship heading your way and of course near the face of Portage Glacier.
The round trip took us about six hours, but if we would have started earlier in the afternoon we could have easily spent an entire day paddling around the icebergs and waiting for the crack, pop and rumble of the calving glacier. If you plan well you can even hike up a portion of the Portage Pass Trail where you’ll get stunning views of the glacial valley, sadly we didn’t have enough time for this. I won’t go into detail about the trip, that’s what the video is for, but I will tell you this paddle is one of our favorite experiences from our time in Alaska. The fact you can safely do this adventure on your own, and you can do it for free, makes this experience even sweeter!
Our Gear and Paddleboard
You don’t need much to make this trip, other than a little experience, a vessel and some snacks, here’s what we had with us to complete this paddling adventure:
- Inflatable SUP – Our Stand-Up Paddle Board is a really nice one that is reinforced with Kevlar to keep its structure. I can’t say how other iSUPs will perform but we have been told by many it will slowly deflate when they go from land to the nearly freezing water (this is pretty much the norm in AK). A hard sided kayak would be fine too but I would not recommend an inflatable kayak or one of those basic ocean kayaks with the holes in the bottom (or anything where you must sit in water while you paddle).
- Booties – Nikki wore her SCUBA Booties, I left mine in the RV which was a bad idea. They’re not a necessity but it’s nice to have warm feet.
- Dry bags – A waterproof dry bag is a must when paddling. We have two different styles that work well, one is an Extra Large Vinyl Dry Bag that can take a beating (we’ve had ours for over 5 years) and then we have a few smaller Lightweight Dry Sacks made from Ultra-Sil Nylon for our cameras, phones, etc. The most important thing I can recommend here is purchase a quality brand and make sure it says “waterproof” and not water resistant, over the years we’ve made the mistake of buying an off-brand dry bag that didn’t last, and when a dry bag gets a hole it no longer stays dry.
- Cameras – A small waterproof camera like the Sony Action Cam or the Olympus Tough is perfect for this adventure. If you’re willing to risk it like we did, a nicer camera like our Sony a6000 makes for better photographs and video (especially with the Shotgun Microphone) but it’s still small enough to manage while out on the water. If you wanna go all out they do make waterproof cases for the a6000, but I’m not sure what it would do to the audio recording quality.
- Personal Floatation Device – Often it’s the law to have a PFD on board, and sometimes it must be attached to your body. We have the belt style PFDs because they don’t get in the way while we’re paddling and that way we always wear them because they’re comfortable. We also have a basic PFD cushion that can be used for flotation if necessary, but the main benefit is it gives your butt some cushion and keeps it off the board, therefore keeping us dry and warm.
- Emergency Kit – It’s always good to have a small Emergency Survival Kit with a Mylar Blanket when you head out into the wild, especially when you’re paddling on nearly freezing water. Spending a few bucks on a kit like this could literally save your life in a wilderness emergency situation.
- Pack Towel – In case you get a little wet or your gear gets a few drops on it, a small packable quick-dry towel comes in super handy. We use ours all the time for paddling, hiking or when heading to the river or beach, you never know when you’ll accidentally get wet.
It’s always good to dress in layers as the Alaskan weather can shift at any time, packing rain gear is smart and a purifying water bottle like our Camelbak All-Clear, or the LifeStraw Bottle, provides unlimited drinking water supply. A few lessons learned: I wish I would have had a gimbal for our cameras, a wind muff for the shotgun mic and I should have risked the Action Cam and used it without the cover since the camera itself is splash proof.
Whittier Alaska
The saying goes “Everything is sh*tt*er in in Whittier!” We heard this over and over throughout our trip, so we’d pretty much blown off the need for a visit, plus me being a cheap a** I didn’t want to pay the tunnel fee just to go to some crappy tourist town. Nikki and I discussed visiting Whittier for several days and finally we decided it’s our due diligence to ourselves, our Alaska Bound series and our readers to visit this town and report back whether or not it’s worth the time (and money) to pass through the Anton Anderson Memorial Tunnel. I’m happy to report we loved the place!
Before you even get to Whittier the tunnel has its own appeal and accolades: At 2.5 miles it’s the Longest tunnel in North America, there’s only one lane and its shared by cars and trains, it’s ventilated by jet turbines and it’s the first tunnel to be designed for -40 Fahrenheit temperatures and 150 mph winds. The cost is $13 for a car (or small RV) round trip, sure it’s more expensive than the Golden Gate Bridge, but we’re in Alaska, where everything comes at a premium.
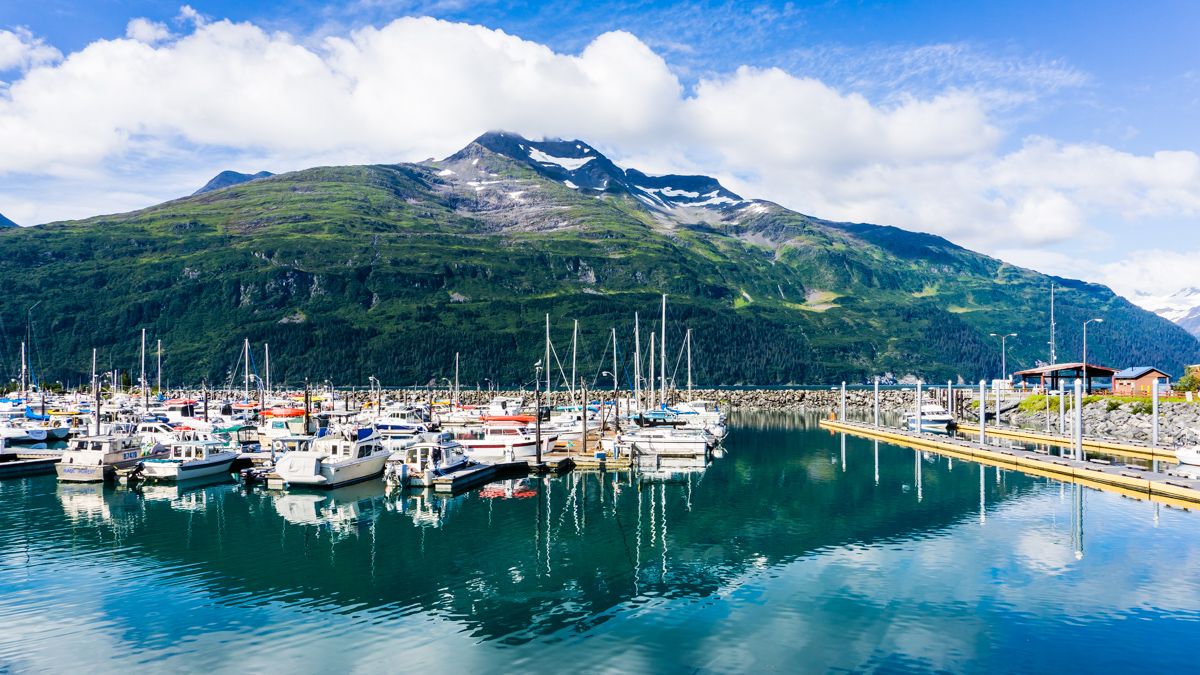
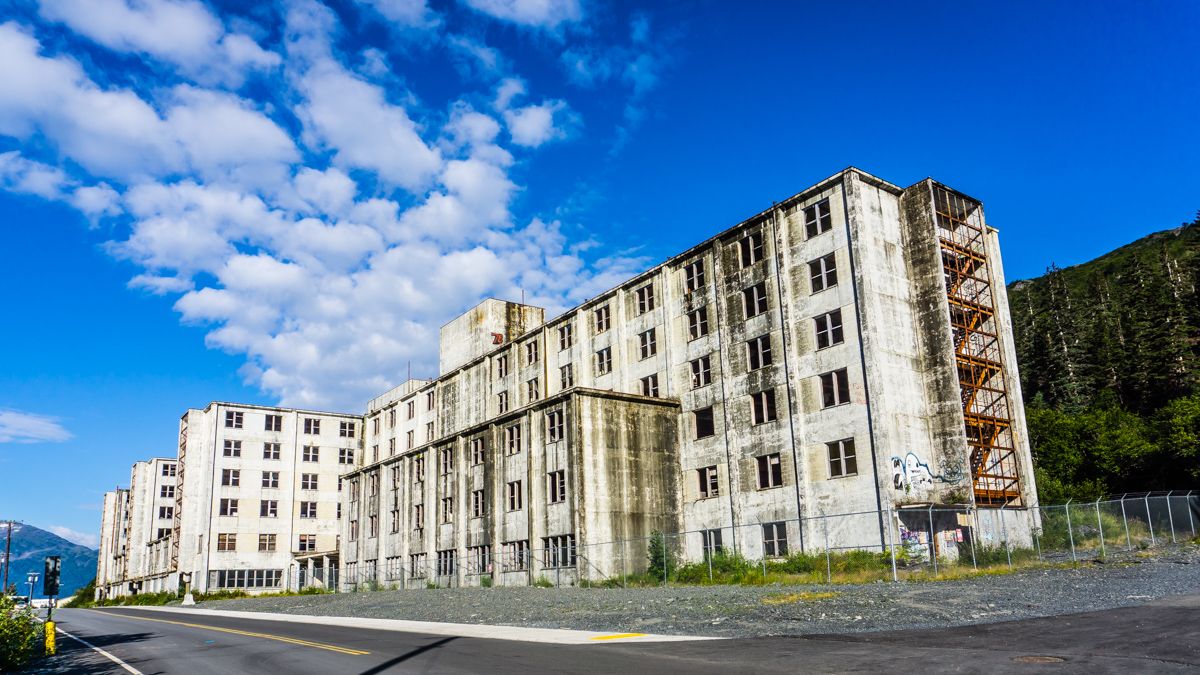
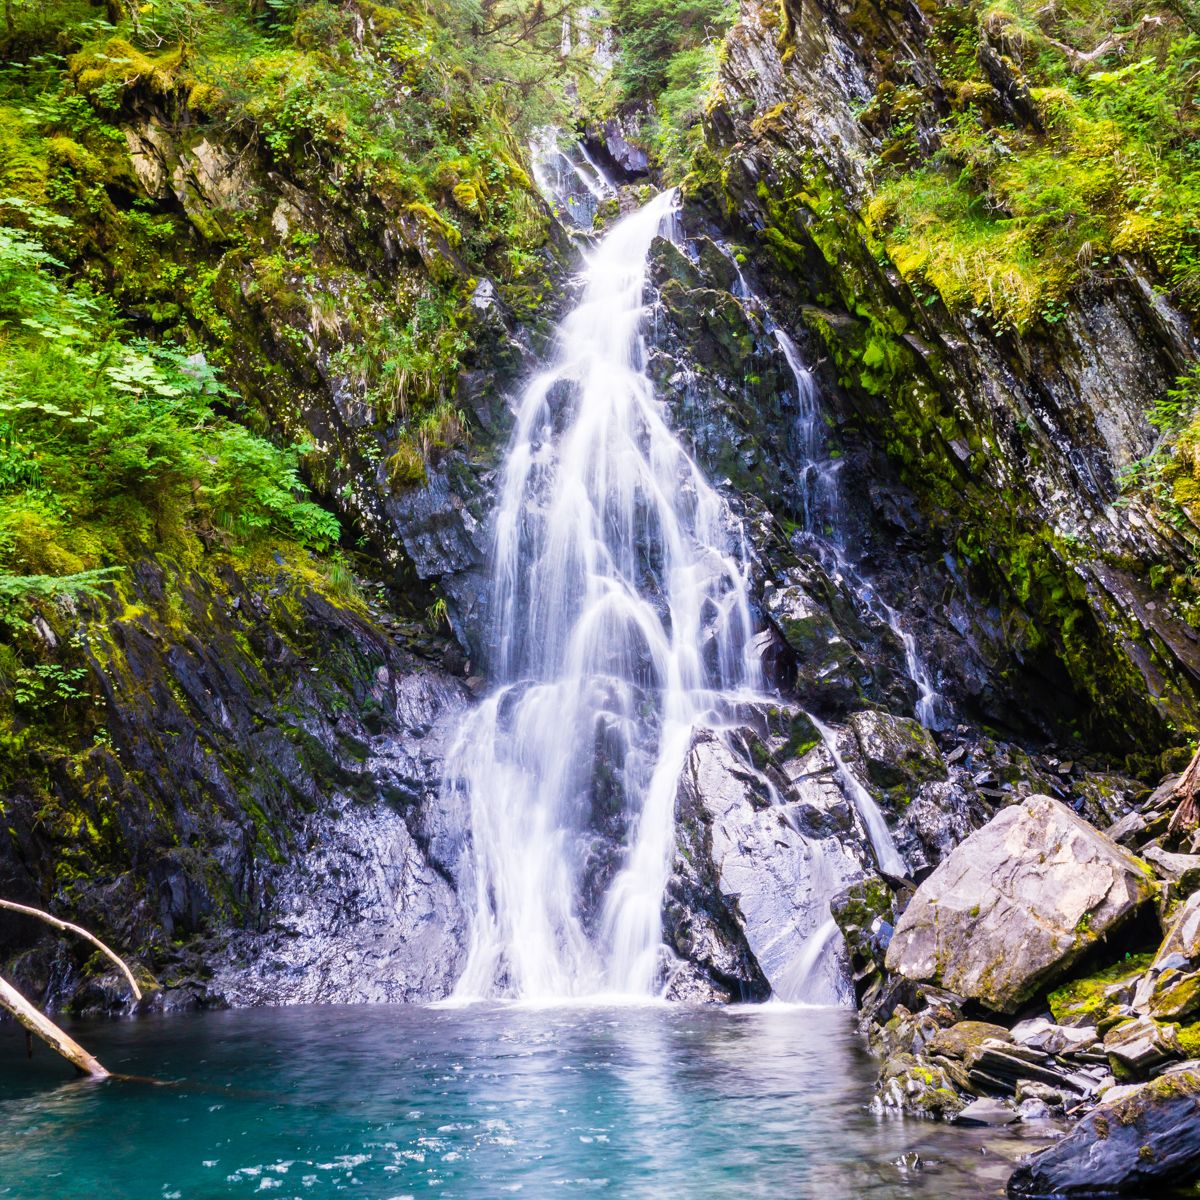
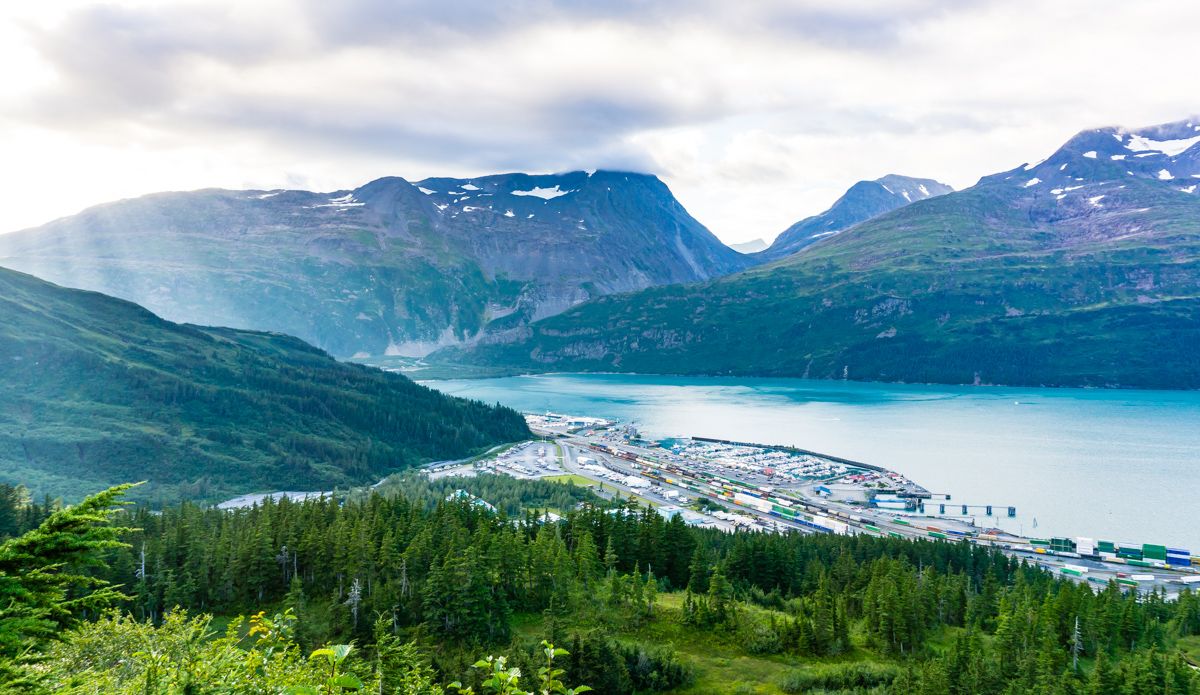
Once we arrived in Whittier we drove straight to the Cruise Ship Terminal to see if one of those behemoths had landed and luckily for us it was a ghost town. We stumbled upon a little coffee shop called the Lazy Otter where the young barista was so excited to pull espresso for a couple coffee snobs she gave us a giant biscotti on the house! Coffee in hand and 2 pastries in our pockets we made our way up the hill to explore. Driving past the historic Buckner Building, an abandoned US Military Dwelling, and down Shotgun Cove Road until the pavement ended and the road caved into a stream. There we hiked a bit scoring a plethora of wild berries and a lovely little waterfall.
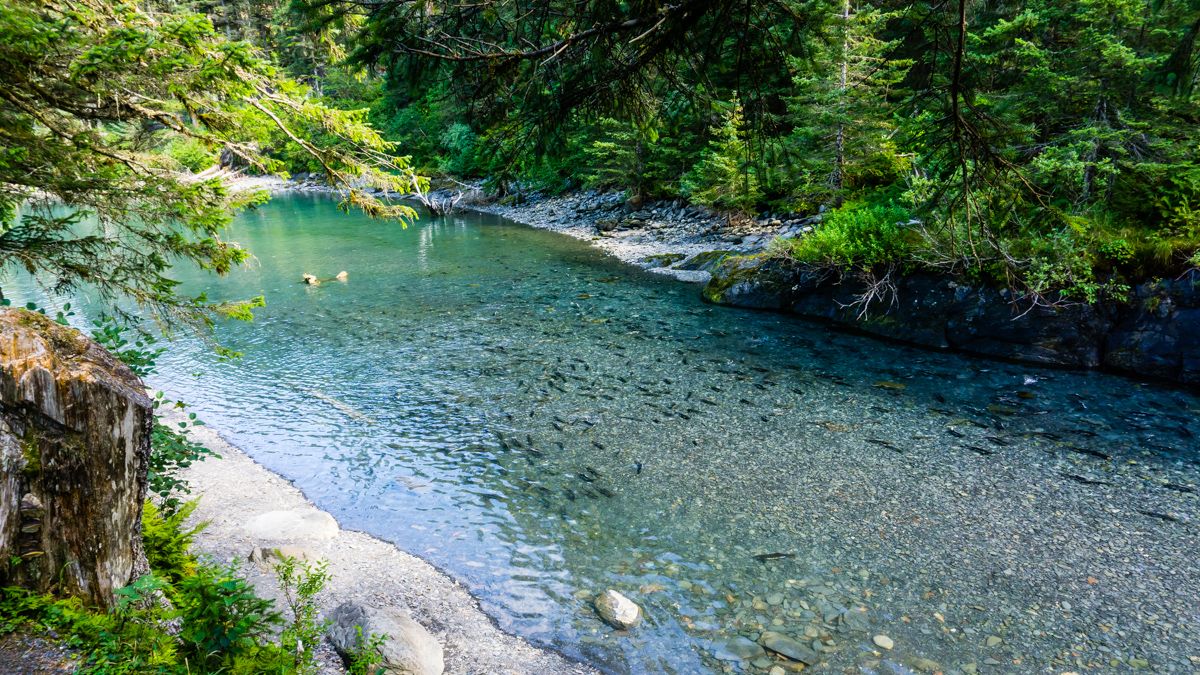
We headed west stopping by Lu Young Park to watch the salmon attempting to jump upstream to spawn, it was quite the sight to see as we marveled at the sheer determination of those fish to make it up the mini waterfalls and through the strong current of Cove Creek (below is the calm part of the creek). We also saw a porcupine and some other small wildlife hanging around the park.
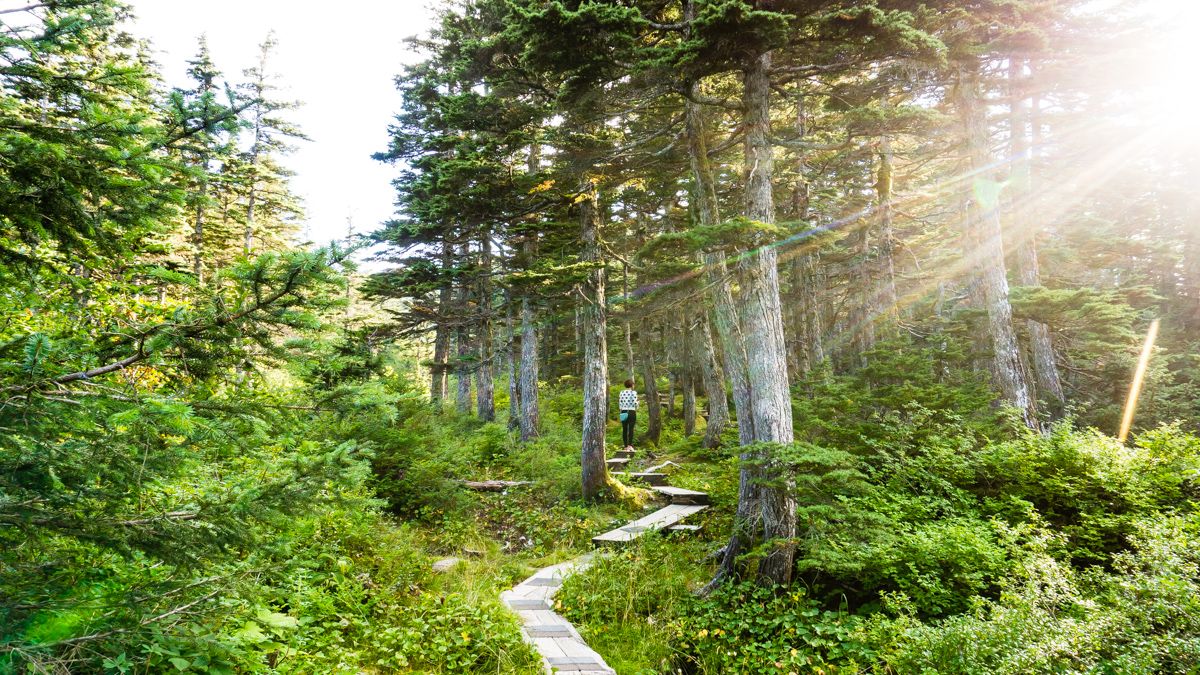
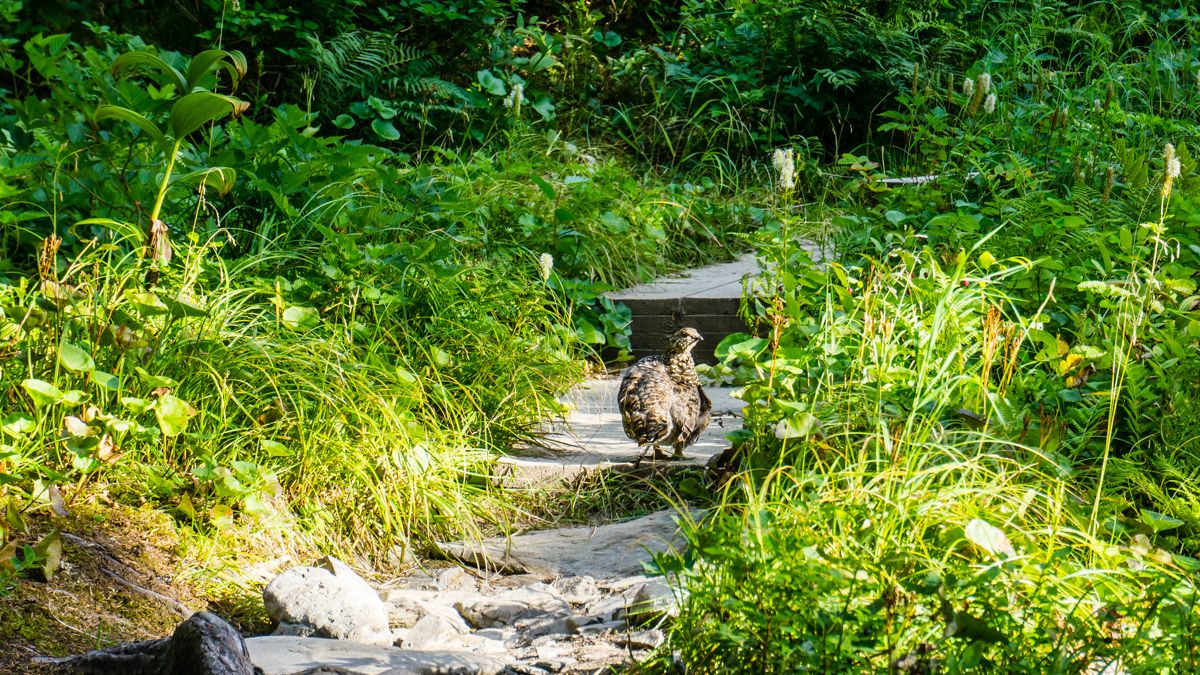
Further to the west, all the way to the dead end of Reservoir Road, we picked up the Horsetail Falls Trail. We’re still not sure exactly where Horsetail Falls is (we did see a waterfall or two off in the distance) but the hike is beautiful and it ends with stunning views of the small town of Whittier and the Prince William Sound. We spotted a family of Ptarmegian and one just would not get off the trail, I swear those little guys have no fear of humans! As usual, Nikki picked way more wild berries than we could carry (she still has blueberry stains in her handbag)…I swear if wild berries were a drug she’d have to go to rehab!
We had hoped to round out our day by hiking a portion of the Portage Pass Trail, however the sun was heading for the horizon and the last tunnel access out of town is around 11pm…and I surely don’t want cough up the cash to pay for a hotel here. With 20 minutes to kill we drove down by the airport and realized there’s free wild camping right here on the water! How great is that! If you decide to pay the Motorhome fee to use the tunnel (currently $22-$38 for larger RVs and towables), you can offset some of the cost by staying here for a night or two: GPS 60.779888, -148.717530
Where We Parked It
This is a sweet spot right off Portage Glacier Road. However there was a notice posted that said something along the lines of “Leave No Trace in order to keep this area available for public use.” I’m guessing people leave their trash lying about so who knows how long the National Forest will allow people to camp here. There are a few other options for pull-outs and there’s a couple of paid National Forest campgrounds on route as well.
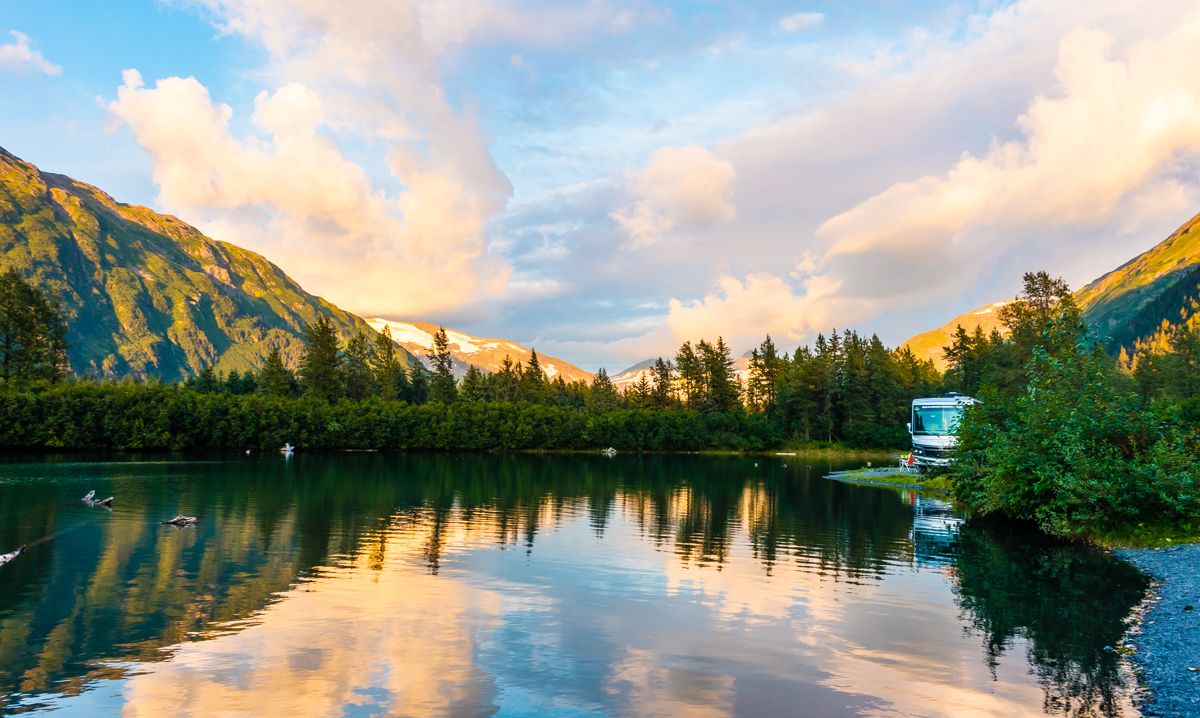
One night we had a tent camper in the forest within ear-shot of our RV and another night we had a small class B at the other end of the pond, but it still felt nice and remote. It’s a short drive, or bike ride, to the Begich Boggs Visitor Center, and just a little further to the tunnel entrance to Whittier. There’s also an extensive hiking trail that picks up just across Portage Glacier Road from our campsite. Here’s the GPS coordinates for our exact spot: 60.792714, -148.900751
Would you ever paddle this close to a glacier or an iceberg? Maybe you’ve already done it yourself? Think we’re crazy for doing it altogether? What’s your take on Whittier and Portage? Please share your thoughts, tips and experiences in the comments below.
Road Report
Fuel Prices – In general the least expensive fuel is found in Anchorage so make sure to fuel up before you hit the Kenai Peninsula. You can get decently affordable fuel near the turnoff for Girdwood/Alyeska.
Road Conditions – Perfectly smooth roads this time of year.
Weather – Highs near 70 with lows near 50. Intermittent clouds here and there but overall the weather was nice and comfortable.
Dates Visited – August 4 – August 6