Someone recently asked us, If you could have any options you want installed on your RV, and cost doesn’t matter, what would your upgrades be?
Well, we can honestly say: Other than adding an automatic dishwasher (because Jason is our current dishwasher) our new setup is pretty freakin’ close!
This RV and and all these modifications and technology are all part of a project we’re calling Resurrecting Dinosaurs. If you aren’t sure what that is make sure to check out the entire Resurrecting Dinosaurs Series.
In our dream world all this technology would be available as pre-wire and standard options from the factory (and this series is all about encouraging those changes) but until then, all of these gadgets and mods could be added to most any RV, and If you’re in a new Bounder like us then you can be positive it’ll all work!
We love RV’ing because it’s an incredibly comfortable way to travel with all the comforts of home, no matter where we are. Which is especially great on a dreary ugly days (like the one in this video) when we don’t really want to be stuck outside in a tent. We can kick back with a warm beverage and snuggle up to a movie…or put on our rain gear and shoot a video like we did yesterday.
Sadly, the way most RV’s are set up is to be plugged in at an RV park or campground, but that isn’t where we always want to be! Sure the occasional full service resort or campground can be a welcome change, but we want to have the ability to be off the cord and in the wild! We’ve always outfitted our RVs for just that, but this is our best Wild Camping set up yet!
Below you will find each product we’ve installed on our new RV, along with our thoughts and pricing information. For more information and detailed specs on any product, click the blue text. We’ve listed pricing and install costs to help you decide if any, or all, of these upgrades are necessary for your RV travels. Please remember these rates are just guidelines based on our experience and install costs, your RV and situation may be different and you may be able to get things cheaper, or you might have to pay a little more if your instillation process is tricky…at least this provides a “jumping off” point.
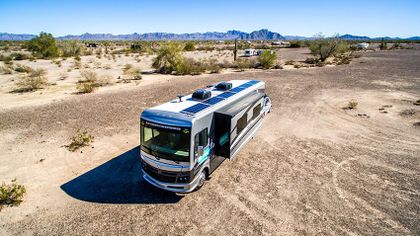
960 Watts of GoPower! Solar Panels with Tilting Kit
- 960 watt system with six 160 watt panels are wired together in series putting out over 100 volts DC. This allows us to use smaller cable for the long run from the solar panels to the solar controller because the amperage is still very low. Here is the link to our EXACT solar setup: GoPower! 960 Watt All Electric Kit
- We have a potential of 54 amps of power per hour when in good sun, that’s a lot of power!
- Tiltable for Alaska and Winter Wild Camping providing up to 40% more power from each panel.
- We are over the recommended “1 watt of solar to 1 amp hour of battery”, but that just means our batteries will charge even faster.
- Several manufactures are also doing solar pre-wire kits, but make sure to verify how much power the pre-wire kit can handle. Our GoPower! pre-wire kit that Fleetwood is using has 10 gauge cable that can handle our beefy system.
- Product Cost – $611.00 each panel = $3,671.94
- Install Cost – $2,200.00 22 hrs of labor billed (includes our Outback Solar Controller too)
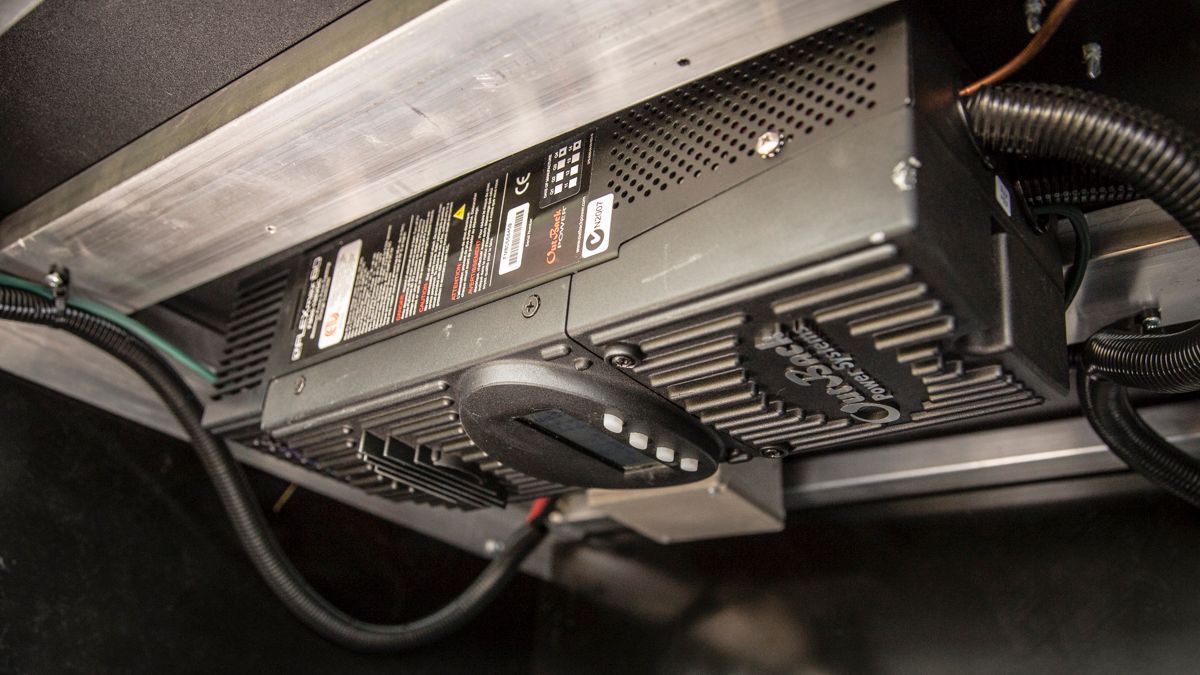
Outback FlexMax 80 MPPT Solar Controller
- Allows for more solar power than a typical 30a PWM solar controller.
- The MPPT solar controller converts the high voltage from the panels down to charge a 12 volt battery back. We have a shorter, much larger cable (#4 AWG) coming out of the solar controller with a heavy duty slow blow fuse to handle the much higher current that is coming out of the solar controller.
- Outback Mate allows for easier monitoring of the solar controller inside the RV.
- Product Cost – $641.99
- Install Cost – Included in solar install pricing.
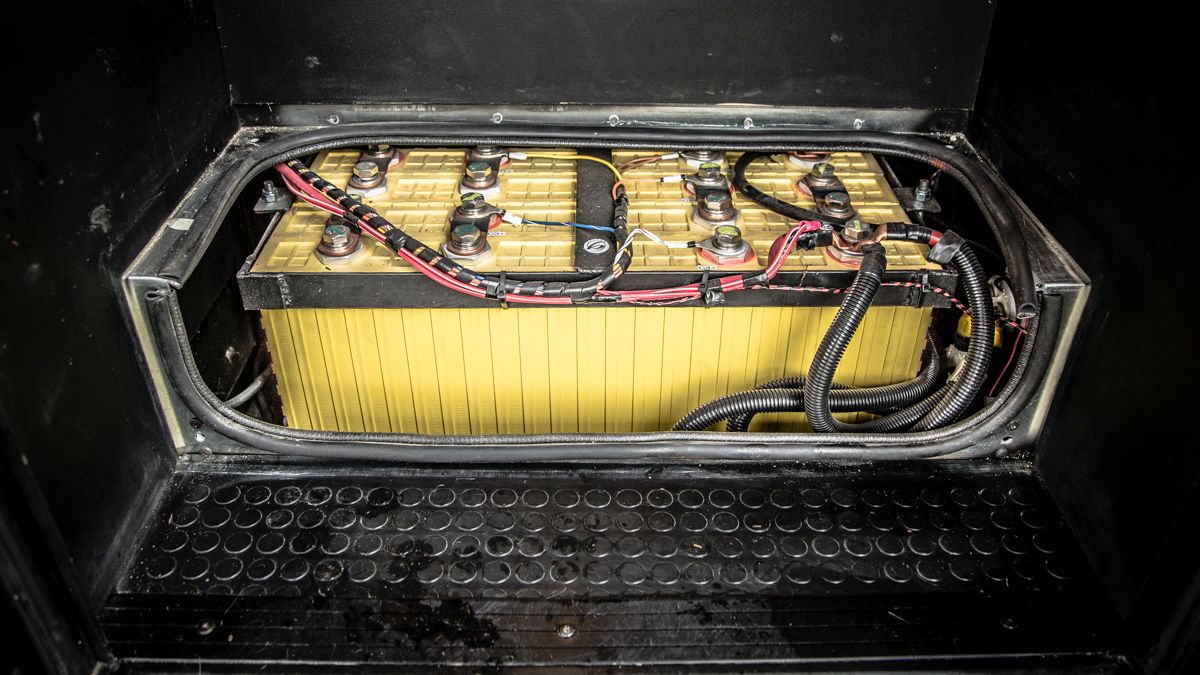
9kWhr (700ah) Lithium Battery Pack
- Standard bounder comes with 4 lead acid batteries totaling 400ah; only 50% of the power is useable which means there’s only 200ah of actual power.
- Our 700ah lithium batteries can be drained to 90% but to be safe we have ours set to 70% so the usable power is 500ah.
- Lithium requires no maintenance which is huge in this coach because of the under the step location of the batteries make it almost impossible to add fluids to a standard flooded battery.
- Lithium batteries have more life cycles (around 3000) and a 7 year battery life expectancy vs. a sealed lead acid battery which only performs a tiny fraction with an average 700 life cycles and a 2.5 year life expectancy.
- Lithium is approximately 1/3 the weight and 50% smaller than lead acid batteries.
- Our Lithium batteries are made with Lithium Yttrium Iron Phosphate (commonly referred to as Lithium LYP Batteries), this type of battery is built to deliver high energy and power density for mobile applications. Lithium Iron Phosphate is safer than other chemistries such as Lithium Cobalt due to “complete oxydation variables”.
- Product Cost – $4,480.00
- Install Cost – $1,800.00 18 hours (includes a custom frame for the battery, we feared the steel “battery enclosure” supplied from the battery maker wouldn’t fit in our space so we asked them to send the cells as separate pieces, hindsight I think the standard box would have slid into our battery compartment no problem and saved us several hundred bucks on the install.)
- While we love our batteries and have had no problems or complaints…we have have not been able to get a hold of the manufacture (Balqon) and don’t feel comfortable recommending them. Which is sad because they were a promising company and the most affordable we had found. We are under the impression their USA division has shut and is no longer fulfilling orders or honoring warranties (especially considering we can’t get a hold of them). Until we feel we have a solid and reputable supplier to recommend that we have personal experience with, we suggest doing your own research to find lithium batteries (check out reputable companies such as Lithionics or Relion) or going with the tried and true AGM batteries.
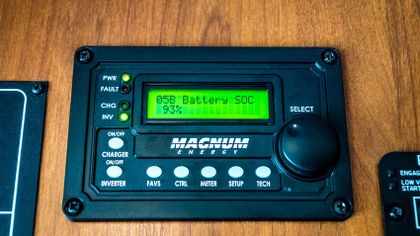
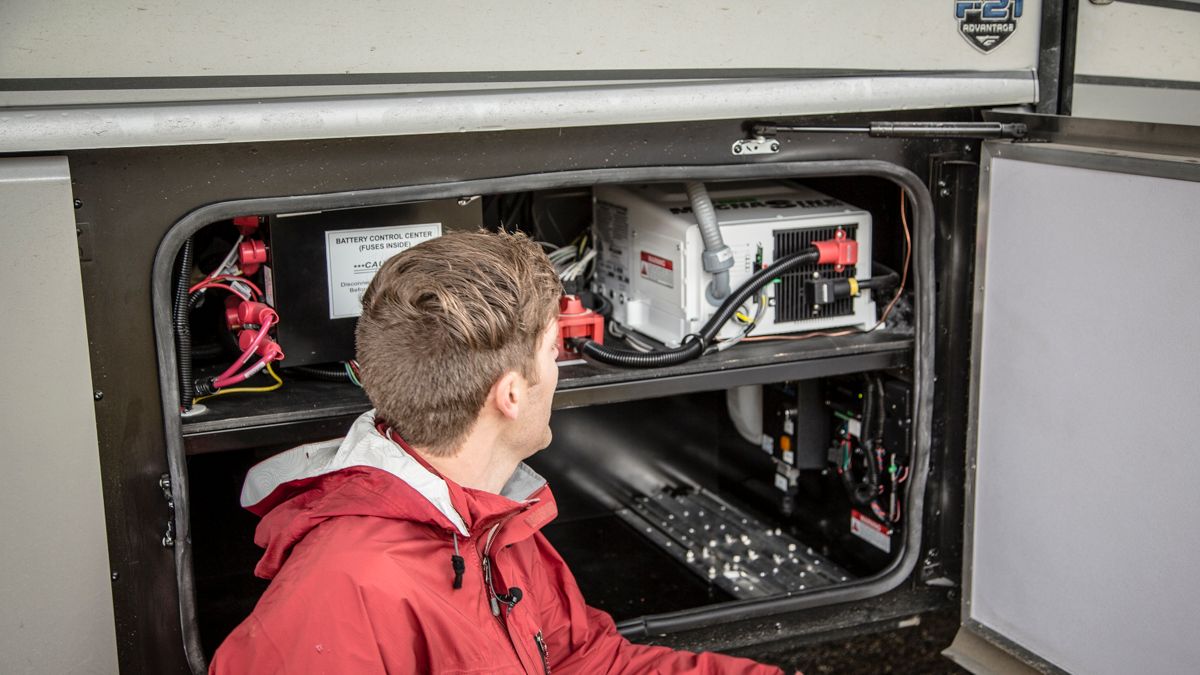
Magnum Hybrid 3000 watt Puresine Wave Inverter, Remote, Auto Gen Start & Battery Monitor Kit
- Hybrid Inverter pulls power from both the Shore Power and the Batteries when needed. This is awesome for driveway surfing, Harvest Hosts, State Park Campgrounds, Thousand Trails, or anywhere you can’t connect to 50a service. It also works for RVs with small generators, such as trailers, with the right setup you can run your A/C units with a tiny 2000 watt Honda Generator!
- AGS – Automatically kicks on the generator to turn on the A/C on hot days and it keeps our batteries from dying, which is extremely important because a dead lithium battery is not good.
- BMK – Our batteries are our “fuel tank” and our solar is the “gas pump”, a Battery Monitoring Kit is like the fuel gauge! The BMK monitors how much power is coming in, going out, and lets us manage our power use during wild camping.
- ARC-50 Remote – To manage all these upgrades we are required to install a higher-end model of the inverter remote.
- Product Cost – Hybrid Inverter $2223.20, AGS $263.20, BMK $175.20, ARC-50 Remote $239.20
- Install Cost – $1,300.00 13 hours (The AGS was a pain in the butt to install due to the temperature sensor location being on the opposite side of the RV.)
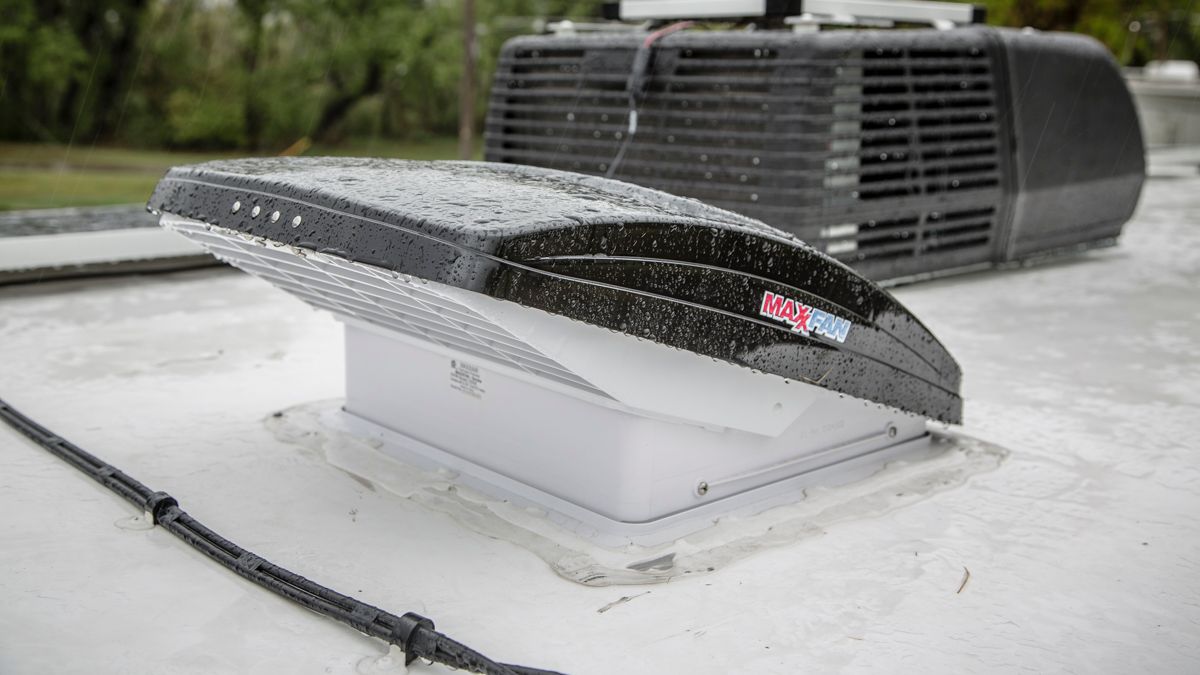
MaxxAir MaxxFan Deluxe Vent Fan
- Automatic temperature settings open and close the vents based on temperatures inside the RV, which gives us peace of mind when we leave the cats in the RV on sunny days.
- The MaxxFan is slim and has a built in rain guard that keeps rain out even when the fan is on and open. Normally we have to add vent Covers which are bulky, reduce air flow and they can cast long shadows over solar panels (this has been an issue in the past for us).
- The MaxxFan has “air in” and “air out” setting to move air better through the coach, I keep the one in the bathroom on “air in” and the one in the kitchen on “air out” so with the windows open we get a ton of air movement inside the coach.
- Product Cost – $263.58 x 2 = $527.16
- Install Cost – $300.00 3 hours (A simple swap pulling out the Fantastic Fans and installing the MaxxFans. The one downside is the MaxxFan doesn’t work with the “open/close” feature built into our IllumaPlex switch system.)
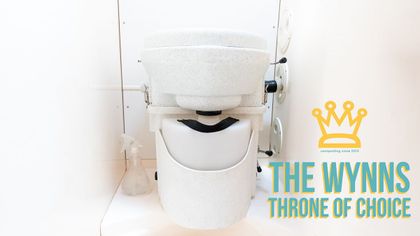
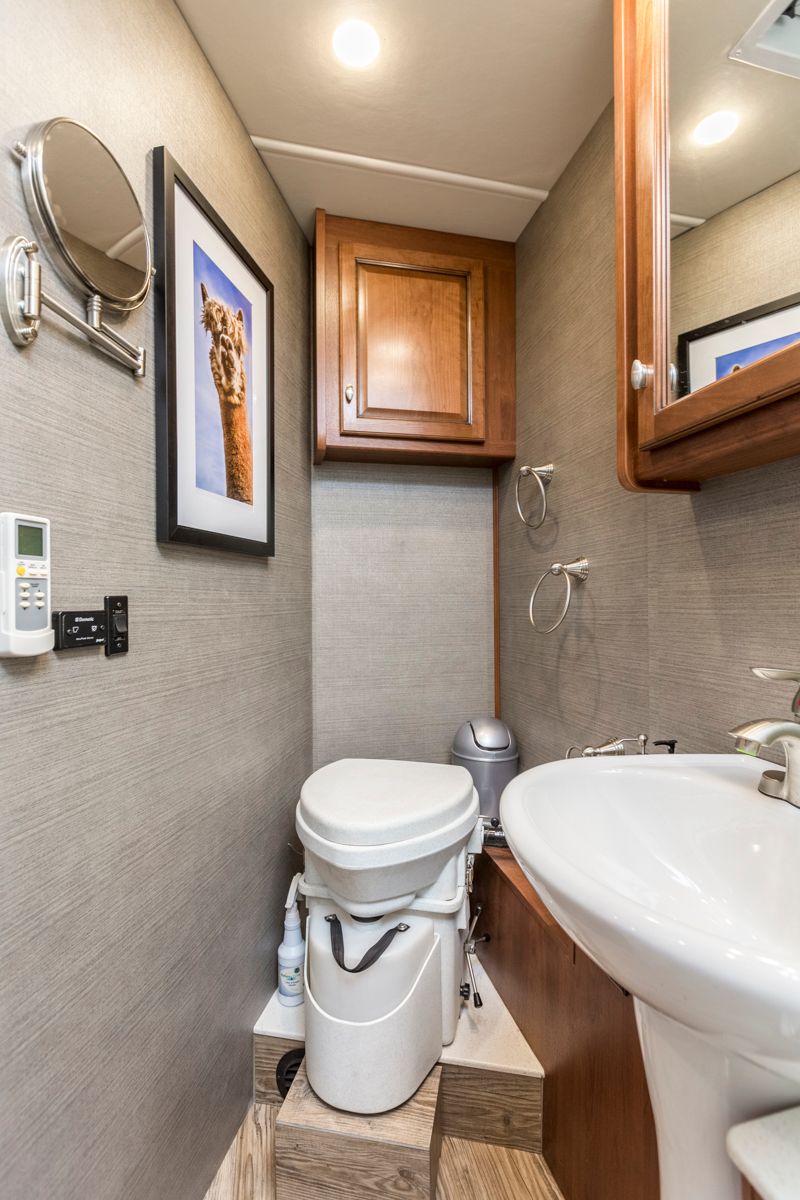
Nature’s Head Composting Toilet
- No black tank, better for the environment, combine black & grey tank for more water storage…I could go on for days; oh wait I already did: www.gonewiththewynns.com/all-composting-toilet
- The best toilet and water saving solution for Wild Camping
- Product Cost – $960
- Install Cost – $1,200.00 12 hours (A fairly straightforward install using the 12v power supply that was pre-existing from the vaccu-flush toilet. We also had the service team create a “stool” to help balance the toilet and provide a step for our feet while sitting.)
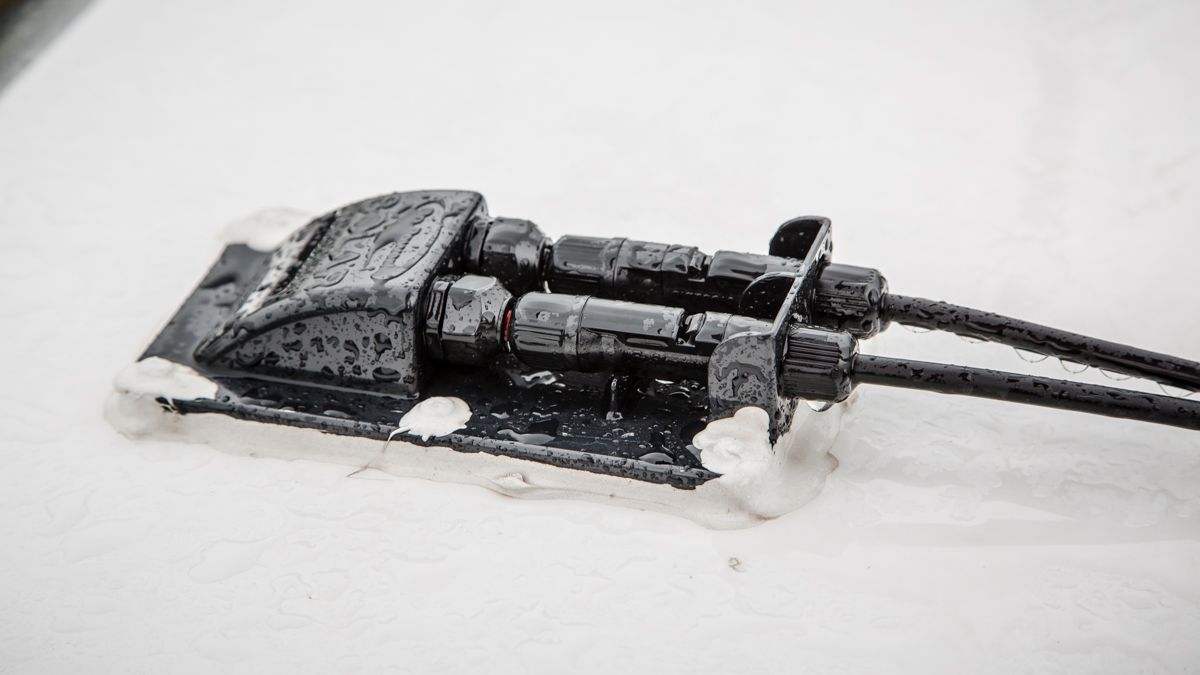
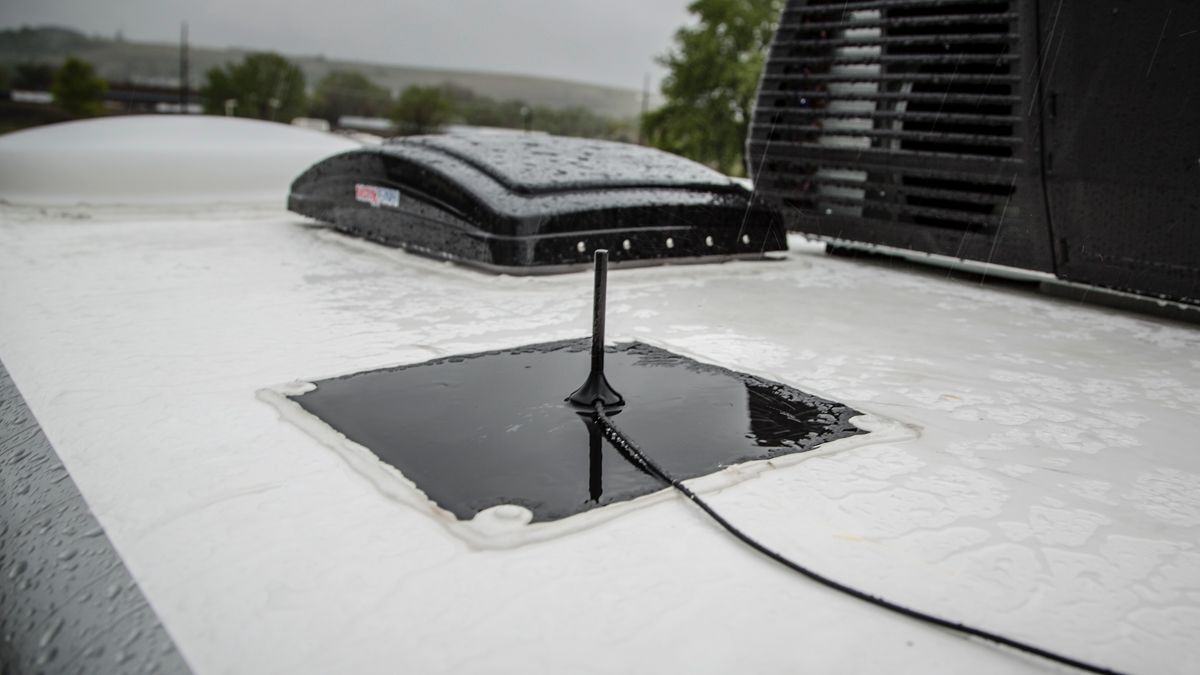
Wilson 4g Booster & metal “ground plane”
- Increases 3g & 4g cellular signal and data speeds. Often it’s the difference between having ZERO signal or having enough bars to stream Amazon videos while Wild Camping…I’m serious this little device works!
- Metal ground plane helps provide a magnetic base (its basically a 12″ x 12″ metal square) for the antenna but more importantly it helps amplify the signal. Our installer screwed the metal plate into our roof but I’m sure a healthy dose of adhesive would have worked just fine.
- Product Cost – $379.99 (doesn’t include ground plane which can be purchased cheap from a home improvement store.)
- Install Cost – $300.00 3 hours (Includes the WiFi Ranger install too since they are both run using the same hole in the roof.)
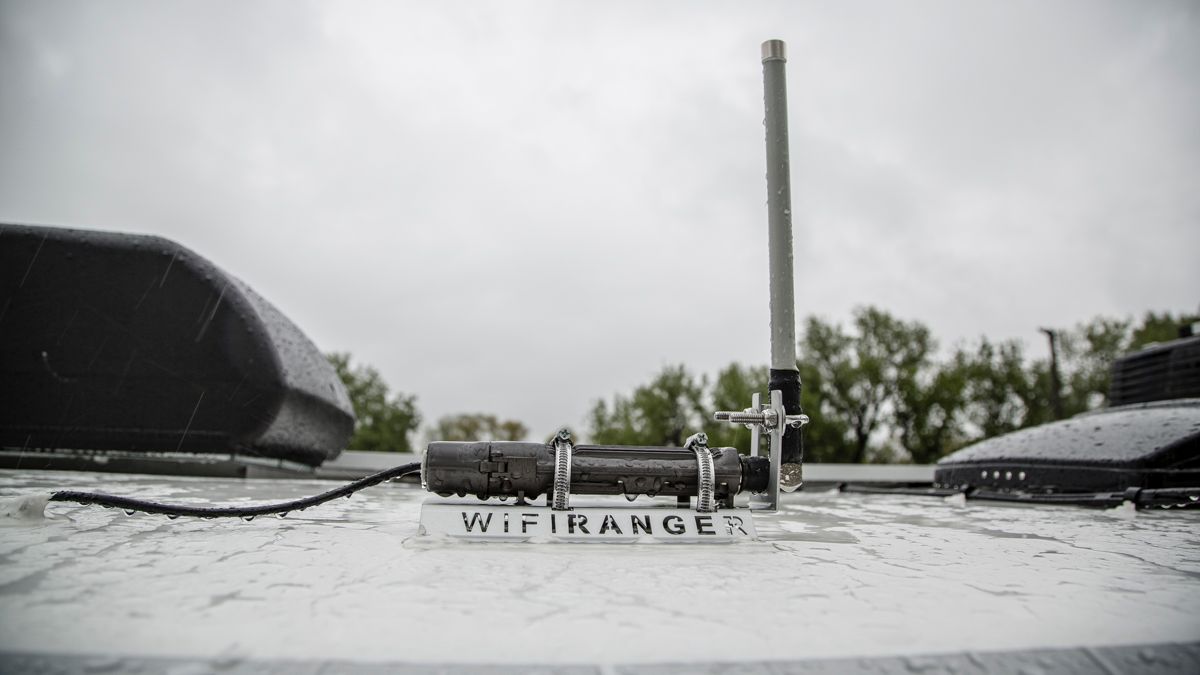
WiFi Ranger GO2 + Elite
- The most powerful antenna available from WiFi Ranger. Easy install, easy setup and great customer support.
- Up to a 2 mile range, but only with a perfect line-of-sight, so don’t expect it to go through walls, big trees, etc.
- Recently we stayed at a campground where there was no WiFi in the park, it was just around the office. We were able to pick up the signal over 1000 feet away from the comfort of our RV and at night when nobody else was able to use the internet we had it all to ourselves to steam movies! It feels kinda wrong when you can do stuff like this 🙂
- Product Cost – $649.99
- Install Cost – Included in Booster instillation costs since they are both run using the same hole in the roof.
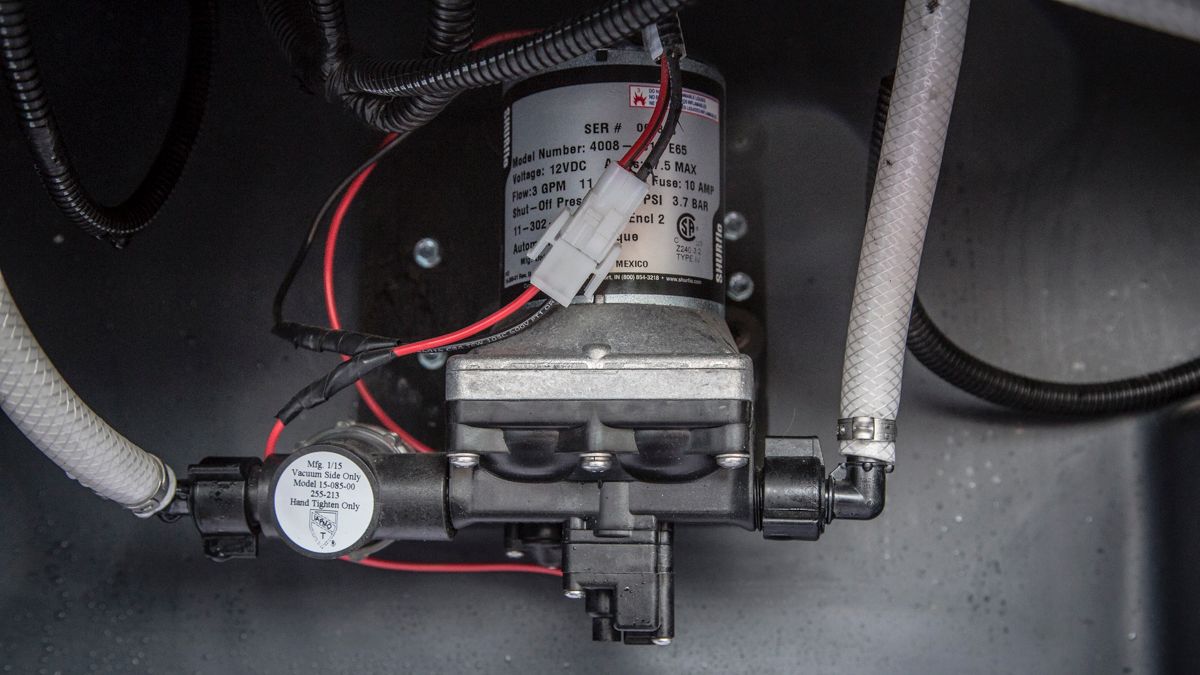
Shurflo Revolution E-65 Water Pump
- No more annoying intermittent vibration noises, no more water pressure loss during pump cycle, this new water pump fits in exactly the same spot as the factory one but runs way more smoothly, even when using low flow faucet aerators and shower heads. It does make some noise so please don’t assume it’s totally quiet, also it will cycle some when restricting water flow (i.e. if you barely turn on the faucet).
- Product Cost – $62.00
- Install Cost – $100.00 1 hour (a direct swap with the factory installed pump.)
Dual Purpose Workstations & Useable Outlet for “office areas”
- Bedroom work station doubles as Nikki’s office and a comfortable place to get ready vs both of us competing for bathroom space.
- Dining room work station is perfectly setup for a laptop or desktop with a handy keyboard tray with storage underneath. No more taking up the dining table for work!
- We requested our service technician to add outlets and make sure they were powered by the inverter in the Kitchen, bathroom and both work areas.
- Install Cost – $900.00 9 hours (Our desks were ‘afterthoughts’ and they are NOT perfect solutions. Unless Fleetwood perfects our concept for these workstations I’d recommend contacting a cabinet shop for this.)


Fridge Lock
- According to Fleetwood, Samsung wouldn’t allow the factory to screw anything into their fridge, so we had to do it at the service center instead. If you have a fridge like ours this little clip works very well, and yes the freezer drawer will slide open while driving without a clip.
- Install Cost – $50.00 0.5 hours (you might be able to purchase this piece and install it yourself, it’s super basic)
Originally thought I could list these items in order of my favorites, but then I realized we like them all, and that’s exactly why we had each of them installed. Remember we’re setting up our RV for lots of Boondocking because we prefer to be out in nature instead of plugged in at an RV park. I’m not saying everyone will need all these upgrades, but if you wish to camp like us, these upgrades will definitely make your Wild Camping and traveling experiences more comfortable…maybe even too comfortable for some!
What do you think about our new RV technology and modifications? We’re totally stoked to use them and report back with our findings over the next several months. Share your thoughts and questions below, we’ll do our best to answer them now or in a future video update (there’s lots of those to come).
Disclaimer – We hand picked each of these upgrades for our new RV to enhance our travel style. Some of the products were purchased and some were provided to Fleetwood for testing purposes, unfortunately we don’t get to keep most of this stuff as we have to give it back when we give back the RV (because its a test unit, not ours). 🙁 As always our opinions are our own and can never be purchased.